TFTPong
An Arduino implementation of the classic game.
TFT Pong
This sketch is a basic implementation of pong for the TFT screen with an Arduino Uno.
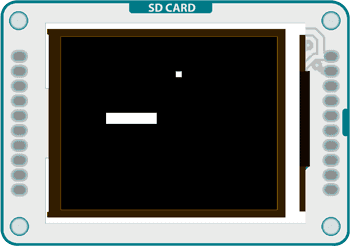
This version of the game creates a rectangular platform that can move in two directions, and a ball that bounces against the edges of the screen as well as the movable platform. Two potentiometers (or other analog sensor) control the position of the platform.
The example demonstrates collision detection between objects on the screen, as well as how to quickly update images without erasing the entire screen every
loop()Hardware Required
Arduino Uno
Arduino TFT screen
breadboard
hookup wire
two 10-kilohm potentiometers
Circuit
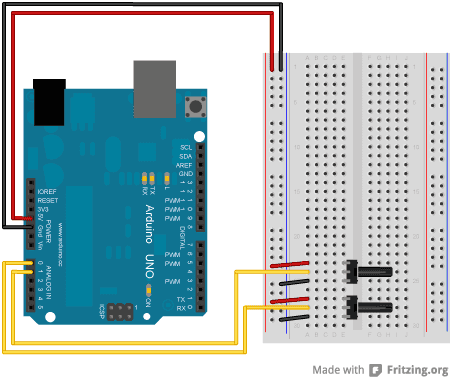
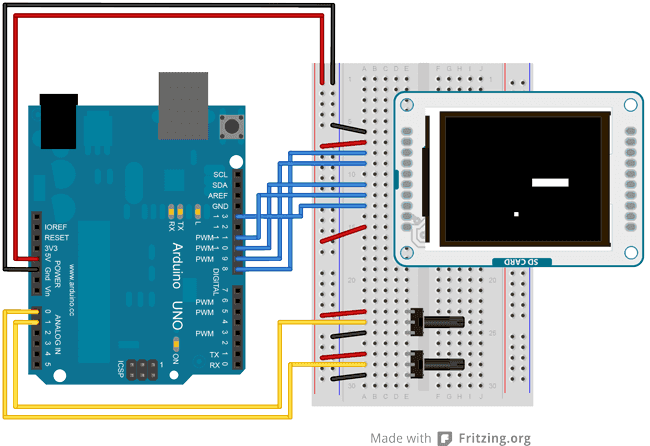
Connect power and ground to the breadboard.
![]()
Place the potentiometers on the breadboard. On each pot, connect one side to ground, and the other to power. Connect the middle pin of one potentiometer to A0, the other one to A1.
Connect the TFT screen to the breadboard. The headers on the side of the screen with the small blue tab and arrow should be the ones that attach to the board. Pay attention to the orientation of the screen, in these images, it is upside down.
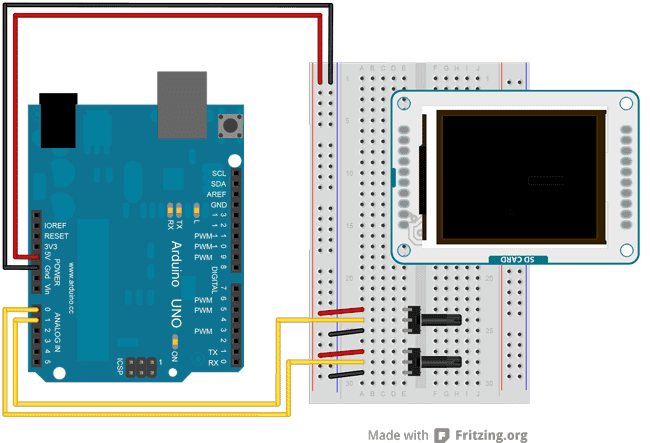
Connect the BL and +5V pins to power, and GND to ground. Connect CS-LD to pin 10, DC to pin 9, RESET to pin 8, MOSI to pin 11, and SCK to pin 13. If uyou're using a Leonardo, you'll be using different pins. see the getting started page for more details.
 Click the image for a larger version
Code
To use the screen you must first include the SPI and TFT libraries.
1#include <SPI.h>2#include <TFT.h>Define the pins you're going to use for controlling the screen, and create an instance of the TFT library named
TFTscreen1#define cs 102#define dc 93#define rst 84
5TFT TFTscreen = TFT(cs, dc, rst);Set up the variables for the ball and paddle x & y positions, the ball's direction, and the previous locations of the ball and paddle.
1int paddleX = 0;2int paddleY = 0;3int oldPaddleX, oldPaddleY;4int ballDirectionX = 1;5int ballDirectionY = 1;6
7int ballX, ballY, oldBallX, oldBallY;In
setup()1void setup() {2
3 TFTscreen.begin();4
5 TFTscreen.background(0,0,0);6}loop()1void loop() {2
3 int myWidth = TFTscreen.width();4
5 int myHeight = TFTscreen.height();6
7 paddleX = map(analogRead(A0), 0, 1023, 0, myWidth) - 20/2;8
9 paddleY = map(analogRead(A1), 0, 1023, 0, myHeight) - 5/2;Set the fill color to black, and erase the previous location of the paddle if it has moved.
1TFTscreen.fill(0,0,0);2
3 if (oldPaddleX != paddleX || oldPaddleY != paddleY) {4
5 TFTscreen.rect(oldPaddleX, oldPaddleY, 20, 5);6
7 }Set the fill color to white, and draw the paddle.
1TFTscreen.fill(255,255,255);2
3 TFTscreen.rect(paddleX, paddleY, 20, 5);Save the paddle's current location as the previous location, so the next time through you can check if it has moved.
1oldPaddleX = paddleX;2
3 oldPaddleY = paddleY;At the end of
loop()ballSpeedballSpeedYou'll call a custom function named
moveBall()1if (millis() % ballSpeed < 2) {2
3 moveBall();4
5 }6}moveBall()inPaddle()1void moveBall() {2
3 if (ballX > TFTscreen.width() || ballX < 0) {4
5 ballDirectionX = -ballDirectionX;6
7 }8
9 if (ballY > TFTscreen.height() || ballY < 0) {10
11 ballDirectionY = -ballDirectionY;12
13 }14
15 if (inPaddle(ballX, ballY, paddleX, paddleY, 20, 5)) {16
17 ballDirectionY = -ballDirectionY;18
19 }20
21 ballX += ballDirectionX;22
23 ballY += ballDirectionY;24
25 TFTscreen.fill(0,0,0);26
27 if (oldBallX != ballX || oldBallY != ballY) {28
29 TFTscreen.rect(oldBallX, oldBallY, 5, 5);30
31 }32
33 TFTscreen.fill(255,255,255);34
35 TFTscreen.rect(ballX, ballY, 5, 5);36
37 oldBallX = ballX;38
39 oldBallY = ballY;40}inPaddle()TRUEmoveBall()1boolean inPaddle(int x, int y, int rectX, int rectY, int rectWidth, int rectHeight) {2
3 boolean result = false;4
5 if ((x >= rectX && x <= (rectX + rectWidth)) &&6
7 (y >= rectY && y <= (rectY + rectHeight))) {8
9 result = true;10
11 }12
13 return result;14}The complete sketch is below :
Suggest changes
The content on docs.arduino.cc is facilitated through a public GitHub repository. If you see anything wrong, you can edit this page here.
License
The Arduino documentation is licensed under the Creative Commons Attribution-Share Alike 4.0 license.