EsploraRemote
Connect the Esplora to Processing and control the outputs.
Esplora Remote
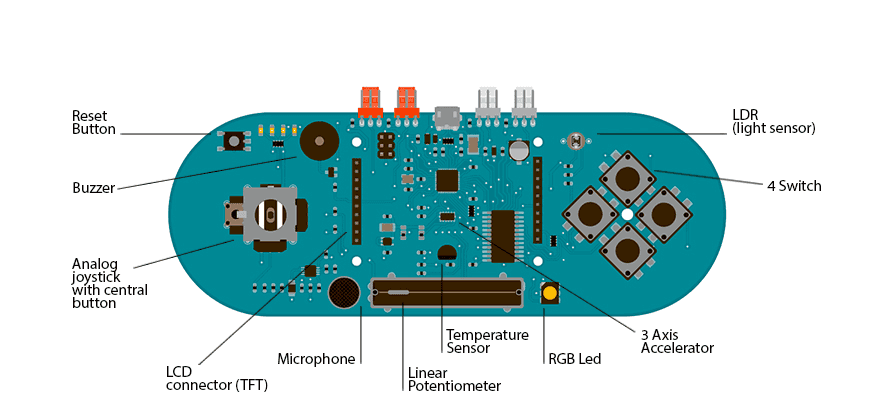
This example is designed to be used with a Processing sketch. Processing is an open source programming environment. The application on the computer reads the sensors on the Esplora board and controls the buzzer and the RGB LED through a graphical interface. The image in the Processing application mirrors the Esplora board, so you'll see a virtual version of your board.
If you don't have Processing installed on your computer, you can also test this example opening the serial monitor and interacting with the Esplora through serial commands.
There are two Processing sketches that work with this example, a simple one that prints the sensors in text, and a more complex one that shows a graphic representation of the Esplora. The former may be better for beginning Processing programmers, and the latter may be better for advanced Processing programmers.
Download the zip file containing the simple Processing sketch for this example.
Download the zip file containing the advanced Processing sketch for this example.
You only need to unzip this folder inside your Processing sketches folder, and open the .pde file in Processing.
Hardware Required
- Arduino Esplora
Software Required
Circuit
Only your Arduino Espora is needed for this example.
Code
This example opens a serial interface to the Esplora. You'll ask the board to read the sensors or write to the buzzer or RGB LED by sending commands over the Esplora's serial port.
The commands always starts with a character, which indicates the operation you want to perform followed by the value you want to write to the actuator or the number of samples you want to collect.
Using this sketch in combination with the application written in Processing, allows you to control the board with a graphical interface, instead of typing the commands through the serial port. It is still possible to control the board by manually entering commands in the serial monitor or serial application.
All sensor values will be displayed on the Esplora drawn on the computer screen, and you can command the buzzer and the RGB led with sliders, clicking on the component.
NOTE: Serial ports on a computer can only be accessed by one program at a time. If you have the Arduino IDE's Serial Monitor open, then the Processing Sketch will not be able to access the Esplora's serial port. Likewise, if the Processing sketch is still running, you won't be able to open the Serial Monitor or reprogram your Esplora.
1/*2
3 Esplora Remote4
5 This sketch allows to test all the Esplora's peripherals.6
7 It is also used with the ProcessingStart sketch (for Processing).8
9 When uploaded, you can open the Serial monitor and write one of10
11 the following commands (without quotes) to get an answer:12
13 "D": prints the current value of all sensors, separated by a comma.14
15 See the dumpInputs() function below to get the meaning of16
17 each value.18
19 "Rxxx"20
21 "Gxxx"22
23 "Bxxx": set the color of the RGB led. For example, write "R255"24
25 to turn on the red to full brightness, "G128" to turn26
27 the green to half brightness, or "G0" to turn off28
29 the green channel.30
31 "Txxxx": play a tone with the buzzer. The number is the32
33 frequency, e.g. "T440" plays the central A note.34
35 Write "T0" to turn off the buzzer.36
37 Created on 22 november 201238
39 By Enrico Gueli <enrico.gueli@gmail.com>40
41 Modified 23 Dec 201242
43 by Tom Igoe44
45 */46
47#include <Esplora.h>48
49void setup() {50
51 Serial.begin(9600);52
53 while (!Serial); // needed for native USB port only54}55
56void loop() {57
58 if (Serial.available()) {59
60 parseCommand();61
62 }63}64
65/*66
67 * This function reads a character from the serial line and68
69 * decide what to do next. The "what to do" part is given by70
71 * function it calls (e.g. dumpInputs(), setRed() and so on).72
73 */74void parseCommand() {75
76 char cmd = Serial.read();77
78 switch (cmd) {79
80 case 'D':81
82 dumpInputs();83
84 break;85
86 case 'R':87
88 setRed();89
90 break;91
92 case 'G':93
94 setGreen();95
96 break;97
98 case 'B':99
100 setBlue();101
102 break;103
104 case 'T':105
106 setTone();107
108 break;109
110 }111}112
113void dumpInputs() {114
115 Serial.print(Esplora.readButton(SWITCH_1));116
117 Serial.print(',');118
119 Serial.print(Esplora.readButton(SWITCH_2));120
121 Serial.print(',');122
123 Serial.print(Esplora.readButton(SWITCH_3));124
125 Serial.print(',');126
127 Serial.print(Esplora.readButton(SWITCH_4));128
129 Serial.print(',');130
131 Serial.print(Esplora.readSlider());132
133 Serial.print(',');134
135 Serial.print(Esplora.readLightSensor());136
137 Serial.print(',');138
139 Serial.print(Esplora.readTemperature(DEGREES_C));140
141 Serial.print(',');142
143 Serial.print(Esplora.readMicrophone());144
145 Serial.print(',');146
147 Serial.print(Esplora.readJoystickSwitch());148
149 Serial.print(',');150
151 Serial.print(Esplora.readJoystickX());152
153 Serial.print(',');154
155 Serial.print(Esplora.readJoystickY());156
157 Serial.print(',');158
159 Serial.print(Esplora.readAccelerometer(X_AXIS));160
161 Serial.print(',');162
163 Serial.print(Esplora.readAccelerometer(Y_AXIS));164
165 Serial.print(',');166
167 Serial.print(Esplora.readAccelerometer(Z_AXIS));168
169 Serial.println();170}171
172void setRed() {173
174 Esplora.writeRed(Serial.parseInt());175}176
177void setGreen() {178
179 Esplora.writeGreen(Serial.parseInt());180}181
182void setBlue() {183
184 Esplora.writeBlue(Serial.parseInt());185}186
187void setTone() {188
189 Esplora.tone(Serial.parseInt());190}Suggest changes
The content on docs.arduino.cc is facilitated through a public GitHub repository. If you see anything wrong, you can edit this page here.
License
The Arduino documentation is licensed under the Creative Commons Attribution-Share Alike 4.0 license.