RobotHelloUser
Hack the robot welcome demo and make your own.
Hello User
This sketch is the first thing you see when starting the robot. It gives you a warm welcome, shows you some of its really amazing features, and lets you personalize some data.
Hardware Required
- Arduino Robot
Instruction
Upload the example, you can keep the USB plugged.
After the starting screen, you'll see a sequence of slides, read through them to see how this example works.
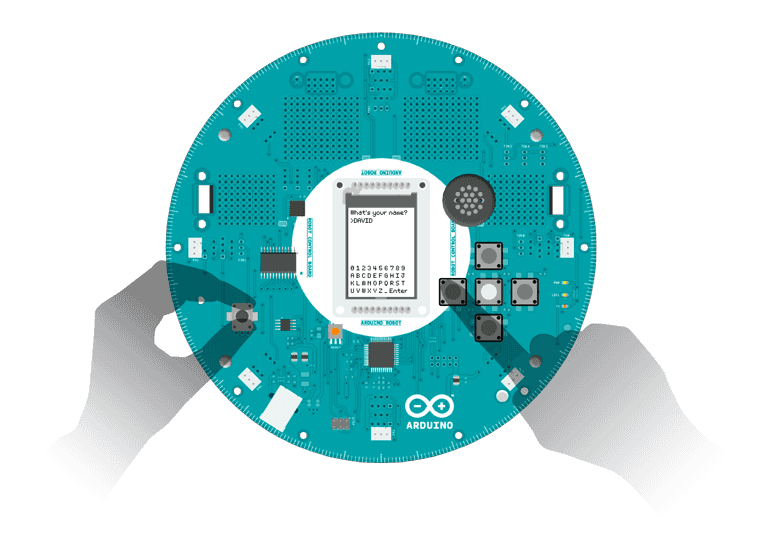
When it comes to the input step, a virtual keyboard will show up on the bottom half of the TFT.
You can use the knob and buttons to select your input.
Use the knob to select key
Press the middle button to input the key selected
Press left/right buttons to move the cursor around
When you're done with an input, input "Enter" on the virtual keyboard
If you want to erase a character, move the cursor to the desired position, and input an empty space to make it disappear.
There's a secret hidden in this example, find it out!
Try it out
Code
1/* Hello User2
3 Hello User! This sketch is the first thing you see4
5 when starting this robot. It gives you a warm welcome,6
7 showing you some of the really amazing abilities of8
9 the robot, and make itself really personal to you.10
11 Circuit:12
13 * Arduino Robot14
15 created 1 May 201316
17 by X. Yang18
19 modified 12 May 201320
21 by D. Cuartielles22
23 This example is in the public domain24
25 */26
27#include <ArduinoRobot.h> // include the robot library28#include <Wire.h>29
30// include the utility function for the sketch31// see the details below32#include <utility/RobotTextManager.h>33
34char buffer[20];//for storing user name35
36void setup() {37
38 //necessary initialization sequence39
40 Robot.begin();41
42 Robot.beginTFT();43
44 Robot.beginSD();45
46 // show the logos from the SD card47
48 Robot.displayLogos();49
50 // clear the screen51
52 Robot.clearScreen();53
54 // From now on, display different slides of55
56 // text/pictures in sequence. The so-called57
58 // scripts are strings of text stored in the59
60 // robot's memory61
62 // these functions are explained below63
64 //Script 665
66 textManager.writeScript(5, 4, 0);67
68 textManager.writeScript(9, 10, 0);69
70 Robot.waitContinue();71
72 delay(500);73
74 Robot.clearScreen();75
76 //Script 777
78 textManager.writeScript(6, 4, 0);79
80 textManager.writeScript(9, 10, 0);81
82 Robot.waitContinue();83
84 delay(500);85
86 Robot.clearScreen();87
88 //Script 889
90 // this function enables sound and images at once91
92 textManager.showPicture("init2.bmp", 0, 0);93
94 textManager.writeScript(7, 2, 0);95
96 textManager.writeScript(9, 7, 0);97
98 Robot.waitContinue();99
100 delay(500);101
102 Robot.clearScreen();103
104 //Script 9105
106 textManager.showPicture("init3.bmp", 0, 0);107
108 textManager.writeScript(8, 2, 0);109
110 textManager.writeScript(9, 7, 0);111
112 Robot.waitContinue();113
114 delay(500);115
116 Robot.clearScreen();117
118 //Script 11119
120 textManager.writeScript(10, 4, 0);121
122 textManager.writeScript(9, 10, 0);123
124 Robot.waitContinue();125
126 delay(500);127
128 Robot.clearScreen();129
130 //Input screen131
132 textManager.writeScript(0, 1, 1);133
134 textManager.input(3, 1, USERNAME);135
136 textManager.writeScript(1, 5, 1);137
138 textManager.input(7, 1, ROBOTNAME);139
140 delay(1000);141
142 Robot.clearScreen();143
144 //last screen145
146 textManager.showPicture("init4.bmp", 0, 0);147
148 textManager.writeText(1, 2, "Hello");149
150 Robot.userNameRead(buffer);151
152 textManager.writeText(3, 2, buffer);153
154 textManager.writeScript(4, 10, 0);155
156 Robot.waitContinue(BUTTON_LEFT);157
158 Robot.waitContinue(BUTTON_RIGHT);159
160 textManager.showPicture("kt1.bmp", 0, 0);161}162
163void loop() {164
165 // do nothing here166}167
168/**169
170textManager mostly contains helper functions for171
172R06_Wheel_Calibration and R01_Hello_User.173
174The ones used in this example:175
176 textManager.setMargin(margin_left, margin_top):177
178 Configure the left and top margin for text179
180 display. The margins will be used for181
182 textManager.writeText().183
184 Parameters:185
186 margin_left, margin_top: the margin values187
188 from the top and left side of the screen.189
190 Returns:191
192 none193
194 textManager.writeScript(script_number,line,column):195
196 Display a script of Hello User example.197
198 Parameters:199
200 script_number: an int value representing the201
202 script to be displayed.203
204 line, column: in which line,column is the script205
206 displayed. Same as writeText().207
208 Returns:209
210 none211
212 textManager.input(line,column,codename):213
214 Print an input indicator(">") in the line and column,215
216 display and receive input from a virtual keyboard,217
218 and save the value into EEPROM represented by codename219
220 Parameters:221
222 line,column: int values represents where the input223
224 starts. Same as wirteText().225
226 codename: either USERNAME,ROBOTNAME,CITYNAME or227
228 COUNTRYNAME. You can call Robot.userNameRead(),229
230 robotNameRead(),cityNameRead() or countryNameRead()231
232 to access the values later.233
234 Returns:235
236 none;237
238 textManager.writeText(line,column,text):239
240 Display text on the specific line and column.241
242 It's different from Robot.text() as the later243
244 uses pixels for positioning the text.245
246 Parameters:247
248 line:in which line is the text displayed. Each line249
250 is 10px high.251
252 column:in which column is the text displayed. Each253
254 column is 8px wide.255
256 text:a char array(string) of the text to be displayed.257
258 Returns:259
260 none261
262 textManager.showPicture(filename, x, y):263
264 It has the same functionality as Robot.drawPicture(),265
266 while fixing the conflict between drawPicture() and267
268 sound playing. Using Robot.drawPicture(), it'll have269
270 glitches when playing sound at the same time. Using271
272 showPicture(), it'll stop sound when displaying273
274 picture, so preventing the problem.275
276 Parameters:277
278 filename:string, name of the bmp file in sd279
280 x,y: int values, position of the picture281
282 Returns:283
284 none285
286*/Suggest changes
The content on docs.arduino.cc is facilitated through a public GitHub repository. If you see anything wrong, you can edit this page here.
License
The Arduino documentation is licensed under the Creative Commons Attribution-Share Alike 4.0 license.