TFTEtchASketch
An Arduino version of the classic Etch-a-Sketch.
TFT EtchASketch

This example for the Arduino TFT draws a white line on the screen, based on the position of 2 potentiometers. If you press a momentary button, the screen will erase.
Hardware Required
Arduino Uno
Arduino TFT screen
breadboard
hookup wire
two 10-kilohm potentiometers
momentary switch
10-kilohm resistor
Circuit
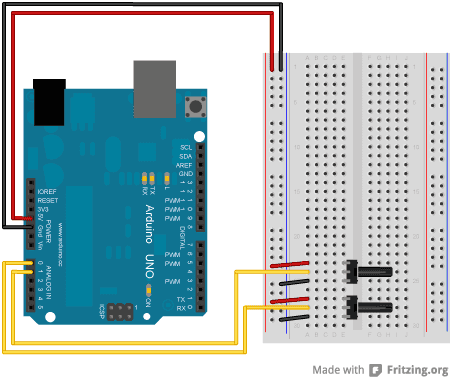
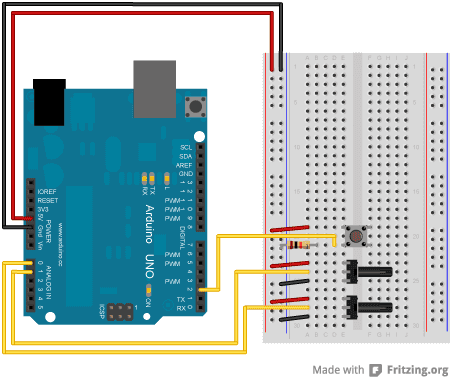
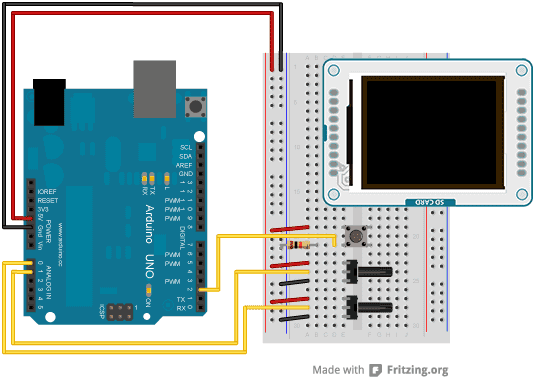
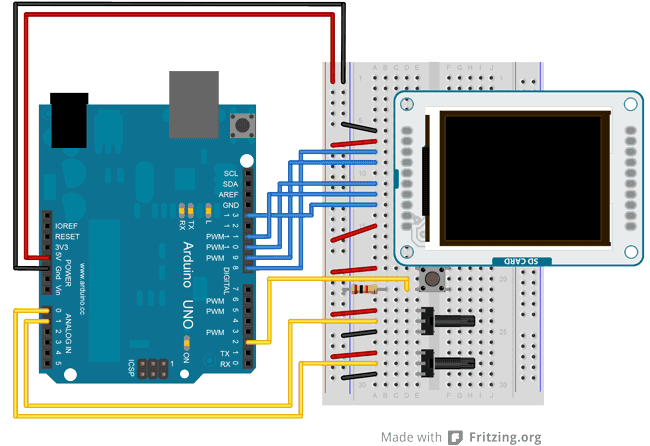
Connect power and ground to the breadboard.
![]()
Place the potentiometers on the breadboard. On each pot, connect one side to ground, and the other to power. Connect the middle pin of one potentiometer to A0, the other one to A1.
Put a switch across the center of the breadboard. Connect one end to power, the other end to the Arduino digital pin 2. Connect the same pin to ground through a 10-kilohm pull-down resistor
Connect the screen to the breadboard. The headers on the side of the screen with the small blue tab and arrow should be the ones that attach to the board. Pay attention to the orientation of the screen, in these images, it is upside down.
Connect the BL and +5V pins to power, and GND to ground. Connect CS-LD to pin 10, DC to pin 9, RESET to pin 8, MOSI to pin 11, and SCK to pin 13. If uyou're using a Leonardo, you'll be using different pins. see the getting started page for more details.
 Click the image for a larger version
Code
To use the screen you must first include the SPI and TFT libraries.
1#include <SPI.h>2#include <TFT.h>Define the pins you're going to use for controlling the screen, and create an instance of the TFT library named
TFTscreen1#define cs 102#define dc 93#define rst 84
5TFT TFTscreen = TFT(cs, dc, rst);Set up the cursor's x & y position. In the example, it starts in the center of the screen; determined by dividing the height and width of the screen by 2. Create a named pin for your erase switch.
1int xPos = LCDscreen.width()/2;2int yPos = LCDscreen.height()/2;3
4int erasePin = 2;In
setup()1void setup() {2
3 pinMode(erasePin, INPUT);4
5 TFTscreen.begin();6
7 TFTscreen.background(0,0,0);8}Read the values of the pots and map them to smaller numbers.
1void loop()2{3
4 int xValue = analogRead(A0);5
6 int yValue = analogRead(A1);7
8 xPos = xPos + (map(xValue, 0, 1023, 2, -2));9
10 yPos = yPos + (map(yValue, 0, 1023, -2, 2));You'll want to keep the cursor from moving offscreen with a few
if()1if(xPos > 159){2
3 (xPos = 159);4
5 }6
7 if(xPos < 0){8
9 (xPos = 0);10
11 }12
13 if(yPos > 127){14
15 (yPos = 127);16
17 }18
19 if(yPos < 0){20
21 (yPos = 0);22
23 }24
25 TFTscreen.stroke(255,255,255);26
27 TFTscreen.point(xPos,yPos);Finally, check the button. If it is being pressed and is
HIGHbackground()1if(digitalRead(erasePin) == HIGH){2
3 TFTscreen.background(0,0,0);4
5 }6
7 delay(33);8}The complete sketch is below :
1/*2
3 TFT EtchASketch4
5 This example for the Arduino screen draws a white point6
7 on the GLCD based on the values of 2 potentiometers.8
9 To clear the screen, press a button attached to pin 2.10
11 This example code is in the public domain.12
13 Created 15 April 2013 by Scott Fitzgerald14
15 http://www.arduino.cc/en/Tutorial/TFTEtchASketch16
17 */18
19#include <TFT.h> // Arduino LCD library20#include <SPI.h>21
22// pin definition for the Uno23#define cs 1024#define dc 925#define rst 826
27// pin definition for the Leonardo28// #define cs 729// #define dc 030// #define rst 131
32TFT TFTscreen = TFT(cs, dc, rst);33
34// initial position of the cursor35int xPos = TFTscreen.width() / 2;36int yPos = TFTscreen.height() / 2;37
38// pin the erase switch is connected to39int erasePin = 2;40
41void setup() {42
43 // declare inputs44
45 pinMode(erasePin, INPUT);46
47 // initialize the screen48
49 TFTscreen.begin();50
51 // make the background black52
53 TFTscreen.background(0, 0, 0);54}55
56void loop() {57
58 // read the potentiometers on A0 and A159
60 int xValue = analogRead(A0);61
62 int yValue = analogRead(A1);63
64 // map the values and update the position65
66 xPos = xPos + (map(xValue, 0, 1023, 2, -2));67
68 yPos = yPos + (map(yValue, 0, 1023, -2, 2));69
70 // don't let the point go past the screen edges71
72 if (xPos > 159) {73
74 (xPos = 159);75
76 }77
78 if (xPos < 0) {79
80 (xPos = 0);81
82 }83
84 if (yPos > 127) {85
86 (yPos = 127);87
88 }89
90 if (yPos < 0) {91
92 (yPos = 0);93
94 }95
96 // draw the point97
98 TFTscreen.stroke(255, 255, 255);99
100 TFTscreen.point(xPos, yPos);101
102 // read the value of the pin, and erase the screen if pressed103
104 if (digitalRead(erasePin) == HIGH) {105
106 TFTscreen.background(0, 0, 0);107
108 }109
110 delay(33);111}Suggest changes
The content on docs.arduino.cc is facilitated through a public GitHub repository. If you see anything wrong, you can edit this page here.
License
The Arduino documentation is licensed under the Creative Commons Attribution-Share Alike 4.0 license.