EsploraTable
Print the Esplora sensor information to a table format.
Accelerometer Table
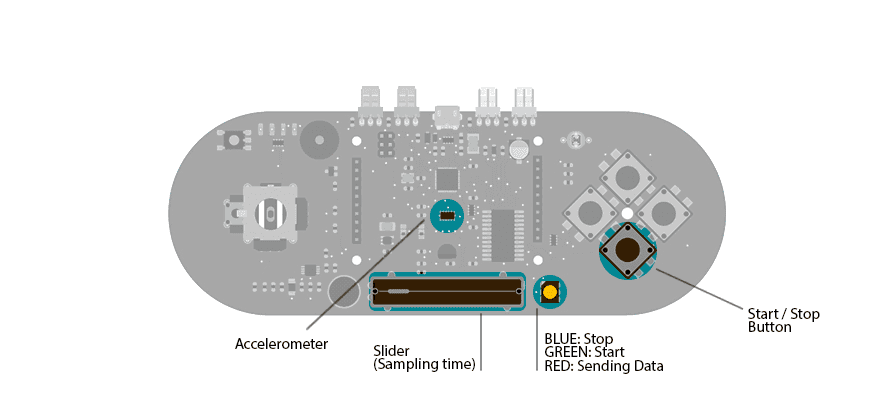
This example simplifies the task of collecting data from the Esplora's accelerometer and graphing it with your computer. The Esplora sends keypresses to a connected computer about the state of the accelerometer. If you open a spreadsheet application, you can log the data from the accelerometer.
To start and stop the datalogging, press the down pushbutton. The Esplora's LED will indicate the state of the logging. The slider is used to set the sampling interval.
Hardware Required
- Arduino Esplora
Circuit
Only your Arduino Esplora is needed for this example.
Code
In this example, the Esplora acts as a keyboard; once the you press the down button, it will send characters to a connected computer.
The characters sent to the computer are formatted to fit inside a spreadsheet's rows and columns. Each row of the spreadheet will contain a timestamp and the 3 accelerometer axis readings.
To start sampling, press the direction down push-button. This begins communication as a keyboard with the computer. Changing the position of the linear potentiometer will change the rate at which samples are read from the accelerometer and written to the computer.
The RGB led is blue when the Esplora is ready, but not sending data. Once the down button is pressed, the LED will turn green. While the Esplora is sending samples to the speradsheet the LED will turn red.
Clicking the button again will stop the Esplora from sending data.
1/*2
3 Esplora Table4
5 Acts like a keyboard that prints sensor6
7 data in a table-like text, row by row.8
9 At startup, it does nothing. It waits for you to open a10
11 spreadsheet (e.g. Google Drive spreadsheet) so it can write12
13 data. By pressing Switch 1, it starts printing the table14
15 headers and the first row of data. It waits a bit, then it16
17 will print another row, and so on.18
19 The amount of time between each row is determined by the slider.20
21 If put to full left, the sketch will wait 10 seconds; at22
23 full right position, it will wait 5 minutes. An intermediate24
25 position will make the sketch wait for some time in-between.26
27 Clicking the Switch 1 at any time will stop the logging.28
29 The color LED shows what the sketch is doing:30
31 blue = idle, waiting for you to press Switch 1 to start logging32
33 green = active; will print soon34
35 red = printing data to the PC36
37 Created on 22 november 201238
39 By Enrico Gueli <enrico.gueli@gmail.com>40
41 modified 24 Nov 201242
43 by Tom Igoe44
45*/46
47#include <Esplora.h>48
49/*50
51 * this variable tells if the data-logging is currently active.52
53 */54
55bool active = false;56
57/*58
59 * this variable holds the time in the future when the sketch60
61 * will "sample" the data (sampling is the act of reading some62
63 * input at a known time). This variable is checked continuously64
65 * against millis() to know when it's time to sample.66
67 */68unsigned long nextSampleAt = 0;69
70/*71
72 * This variable just holds the millis() value at the time the73
74 * logging was activated. This is needed to enter the correct75
76 * value in the "Time" column in the printed table.77
78 */79unsigned long startedAt = 0;80
81/*82
83 * when the "active" variable is set to true, the same is done84
85 * with this variable. This is needed because the code that does86
87 * the "just-after-activation" stuff is run some time later than88
89 * the code that says "be active now".90
91 */92
93bool justActivated = false;94
95/*96
97 * this variable holds the last sensed status of the switch press98
99 * button. If the code sees a difference between the value of100
101 * this variable and the current status of the switch, it means102
103 * that the button was either pressed or released.104
105 */106
107bool lastStartBtn = HIGH;108
109/*110
111 * Initialization code. The virtual USB keyboard must be112
113 * initialized; the Serial class is needed just for debugging.114
115 */116void setup() {117
118 Keyboard.begin();119
120 Serial.begin(9600);121}122
123/*124
125 * This code is run continuously.126
127 */128void loop() {129
130 /*131
132 * note: we don't use Arduino's delay() here, because we can't133
134 * normally do anything while delaying. Our own version lets us135
136 * check for button presses often enough to not miss any event.137
138 */139
140 activeDelay(50);141
142 /*143
144 * the justActivated variable may be set to true in the145
146 * checkSwitchPress() function. Here we check its status to147
148 * print the table headers and configure what's needed to.149
150 */151
152 if (justActivated == true) {153
154 justActivated = false; // do this just once155
156 printHeaders();157
158 // do next sampling ASAP159
160 nextSampleAt = startedAt = millis();161
162 }163
164 if (active == true) {165
166 if (nextSampleAt < millis()) {167
168 // it's time to sample!169
170 int slider = Esplora.readSlider();171
172 // the row below maps the slider position to a range between173
174 // 10 and 290 seconds.175
176 int sampleInterval = map(slider, 0, 1023, 10, 290);177
178 nextSampleAt = millis() + sampleInterval * 1000;179
180 logAndPrint();181
182 }183
184 // let the RGB led blink green once per second, for 200ms.185
186 unsigned int ms = millis() % 1000;187
188 if (ms < 200) {189
190 Esplora.writeGreen(50);191
192 } else {193
194 Esplora.writeGreen(0);195
196 }197
198 Esplora.writeBlue(0);199
200 } else201
202 // while not active, keep a reassuring blue color coming203
204 // from the Esplora...205
206 {207
208 Esplora.writeBlue(20);209
210 }211
212}213
214/*215
216 * Print the table headers.217
218 */219void printHeaders() {220
221 Keyboard.print("Time");222
223 Keyboard.write(KEY_TAB);224
225 activeDelay(300); // Some spreadsheets are slow, e.g. Google226
227 // Drive that wants to save every edit.228
229 Keyboard.print("Accel X");230
231 Keyboard.write(KEY_TAB);232
233 activeDelay(300);234
235 Keyboard.print("Accel Y");236
237 Keyboard.write(KEY_TAB);238
239 activeDelay(300);240
241 Keyboard.print("Accel Z");242
243 Keyboard.println();244
245 activeDelay(300);246}247
248void logAndPrint() {249
250 // do all the samplings at once, because keystrokes have delays251
252 unsigned long timeSecs = (millis() - startedAt) / 1000;253
254 int xAxis = Esplora.readAccelerometer(X_AXIS);255
256 int yAxis = Esplora.readAccelerometer(Y_AXIS);257
258 int zAxis = Esplora.readAccelerometer(Z_AXIS);259
260 Esplora.writeRed(100);261
262 Keyboard.print(timeSecs);263
264 Keyboard.write(KEY_TAB);265
266 activeDelay(300);267
268 Keyboard.print(xAxis);269
270 Keyboard.write(KEY_TAB);271
272 activeDelay(300);273
274 Keyboard.print(yAxis);275
276 Keyboard.write(KEY_TAB);277
278 activeDelay(300);279
280 Keyboard.print(zAxis);281
282 Keyboard.println();283
284 activeDelay(300);285
286 Keyboard.write(KEY_HOME);287
288 Esplora.writeRed(0);289}290
291/**292
293 * Similar to delay(), but allows the program to do something else294
295 * in the meanwhile. In particular, it calls checkSwitchPress().296
297 * Note 1: it may wait longer than the specified amount, not less;298
299 * Note 2: beware of data synchronization issues, e.g. if the300
301 * activeDelay() function alters some variables used by the302
303 * caller of this function.304
305 */306void activeDelay(unsigned long amount) {307
308 unsigned long at = millis() + amount;309
310 while (millis() < at) {311
312 checkSwitchPress();313
314 }315}316
317/*318
319 * This function reads the status of the switch; if it sees that320
321 * it was pressed, toggles the status of the "active" variable.322
323 * If it's set to true, also the justActivated variable is set to324
325 * true, so the loop() function above can do the right things.326
327 * This function should be called as often as possible and do as328
329 * little as possible, because it can be called while another330
331 * function is running.332
333 */334void checkSwitchPress() {335
336 bool startBtn = Esplora.readButton(SWITCH_DOWN);337
338 if (startBtn != lastStartBtn) {339
340 if (startBtn == HIGH) { // button released341
342 active = !active;343
344 if (active) {345
346 justActivated = true;347
348 }349
350 }351
352 lastStartBtn = startBtn;353
354 }355}Suggest changes
The content on docs.arduino.cc is facilitated through a public GitHub repository. If you see anything wrong, you can edit this page here.
License
The Arduino documentation is licensed under the Creative Commons Attribution-Share Alike 4.0 license.