Installing Modules
Learn how to install and remove external modules on your Arduino board.
Your MicroPython installation comes with a set of modules built-in to the firmware. If you are using any external components such as sensors, displays or neopixels, you will need to install these manually.
There are currently two methods available when installing a module on your board running MicroPython:
- Using the
module on your board, (download and install via Wi-Fi® connection),mip - using
on your computer (download and install through a USB connection),mpremote
In this article, we will cover these two methods, as well as how to remove them from your board.
Please note: installing packages that contain 2-byte characters (such as emojis, Chinese symbols), is currently not supported in the Arduino Lab for MicroPython editor. You will however receive a "successful installation" response, which is a bug being investigated.
Hardware & Software Needed
Option 1: MIP
Please note that the
module requires a stable Internet connection via Wi-Fi. Installation may fail if connection is unstable.mip
mip is a module that allows you to install external packages/libraries/modules remotely. This module is built in to your MicroPython firmware.
To use the
mipNote: Replace "YOUR_NETWORK_NAME" and "" YOUR_NETWORK_PASSWORD" with the SSID and password for your Wi-Fi® network.
1import network2
3WIFI_NETWORK='YOUR_NETWORK_NAME'4WIFI_PASSWORD='YOUR_NETWORK_PASSWORD'5
6wlan = network.WLAN(network.STA_IF)7wlan.active(True)8wlan.connect(WIFI_NETWORK, WIFI_PASSWORD)9
10print()11print("Connected to ",WIFI_NETWORK)Once you are connected, you can use the
mipYou can install by specifying the organisation and repository:
1import mip2mip.install(github:org/repo)Or you can specify the url to the file you want to install:
1mip.install("https://raw.githubusercontent.com/tinypico/tinypico-micropython/master/lis3dh%20library/lis3dh.py")Files are added to a folder named
libThere are a number of ways you can use the
method, read more about this in the MIP documentation.install()
Complete Example
In this example, we first connect to Wi-Fi®, and then proceed to install the `arduino-iot-cloud-py module.
1import network2import mip3
4# enter wi-fi creds5WIFI_NETWORK='YOUR_NETWORK_NAME'6WIFI_PASSWORD='YOUR_NETWORK_PASSWORD'7
8# connect to wi-fi9wlan = network.WLAN(network.STA_IF)10wlan.active(True)11wlan.connect(WIFI_NETWORK, WIFI_PASSWORD)12
13print()14print("Connected to ",WIFI_NETWORK)15
16# install the arduino-iot-cloud module17mip.install("github:arduino/arduino-iot-cloud-py")Running this example twice will result in a
error, as you have already connected to Wi-Fi. Once you have connected once to Wi-Fi, you only need to use the 202
method.mip.install()
Failed Installation
Installation via
mipThis is typically not an issue with smaller installations (like single files), but when installing larger packages it is increased.
You can install the same module again, it will only overwrite the existing version.
Option 2: Mpremote
To install a MicroPython module on your board, you can use the Python based tool
mpremotempremote1$ pip install mpremoteRun
mpremote connect list1/dev/cu.usbmodem3871345733302 335B34603532 2341:055b Arduino Portenta Virtual Comm Port in HS ModePass this serial number (the second value) to the install command:
1$ mpremote connect id:335B34603532 mip install github:arduino/arduino-iot-cloud-pyThis will install the library and all required dependencies on the board.
Error: Certificate Verify Fail (MacOS)
On some computers, you may receive error:
1[SSL: CERTIFICATE_VERIFY_FAILED] certificate verify failed:2unable to get local issuer certificate (_ssl.c:1002)This indicates a problem with the Python version installed, and that it is unable to locate the SSL certificate. To work around this, navigate to your Python installation (typically Applications > Python 3.X), and run the
Install Certificates.command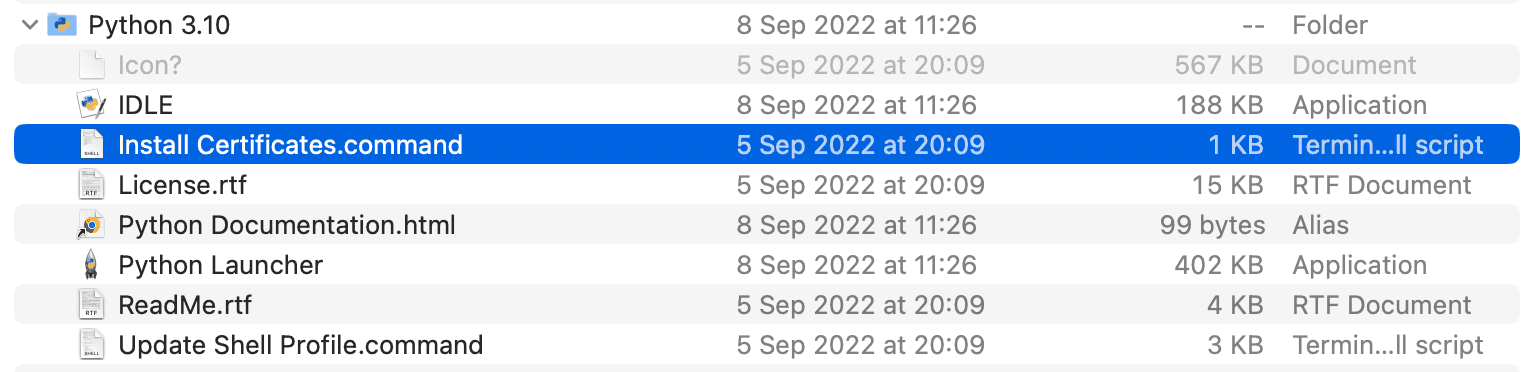
Delete Files
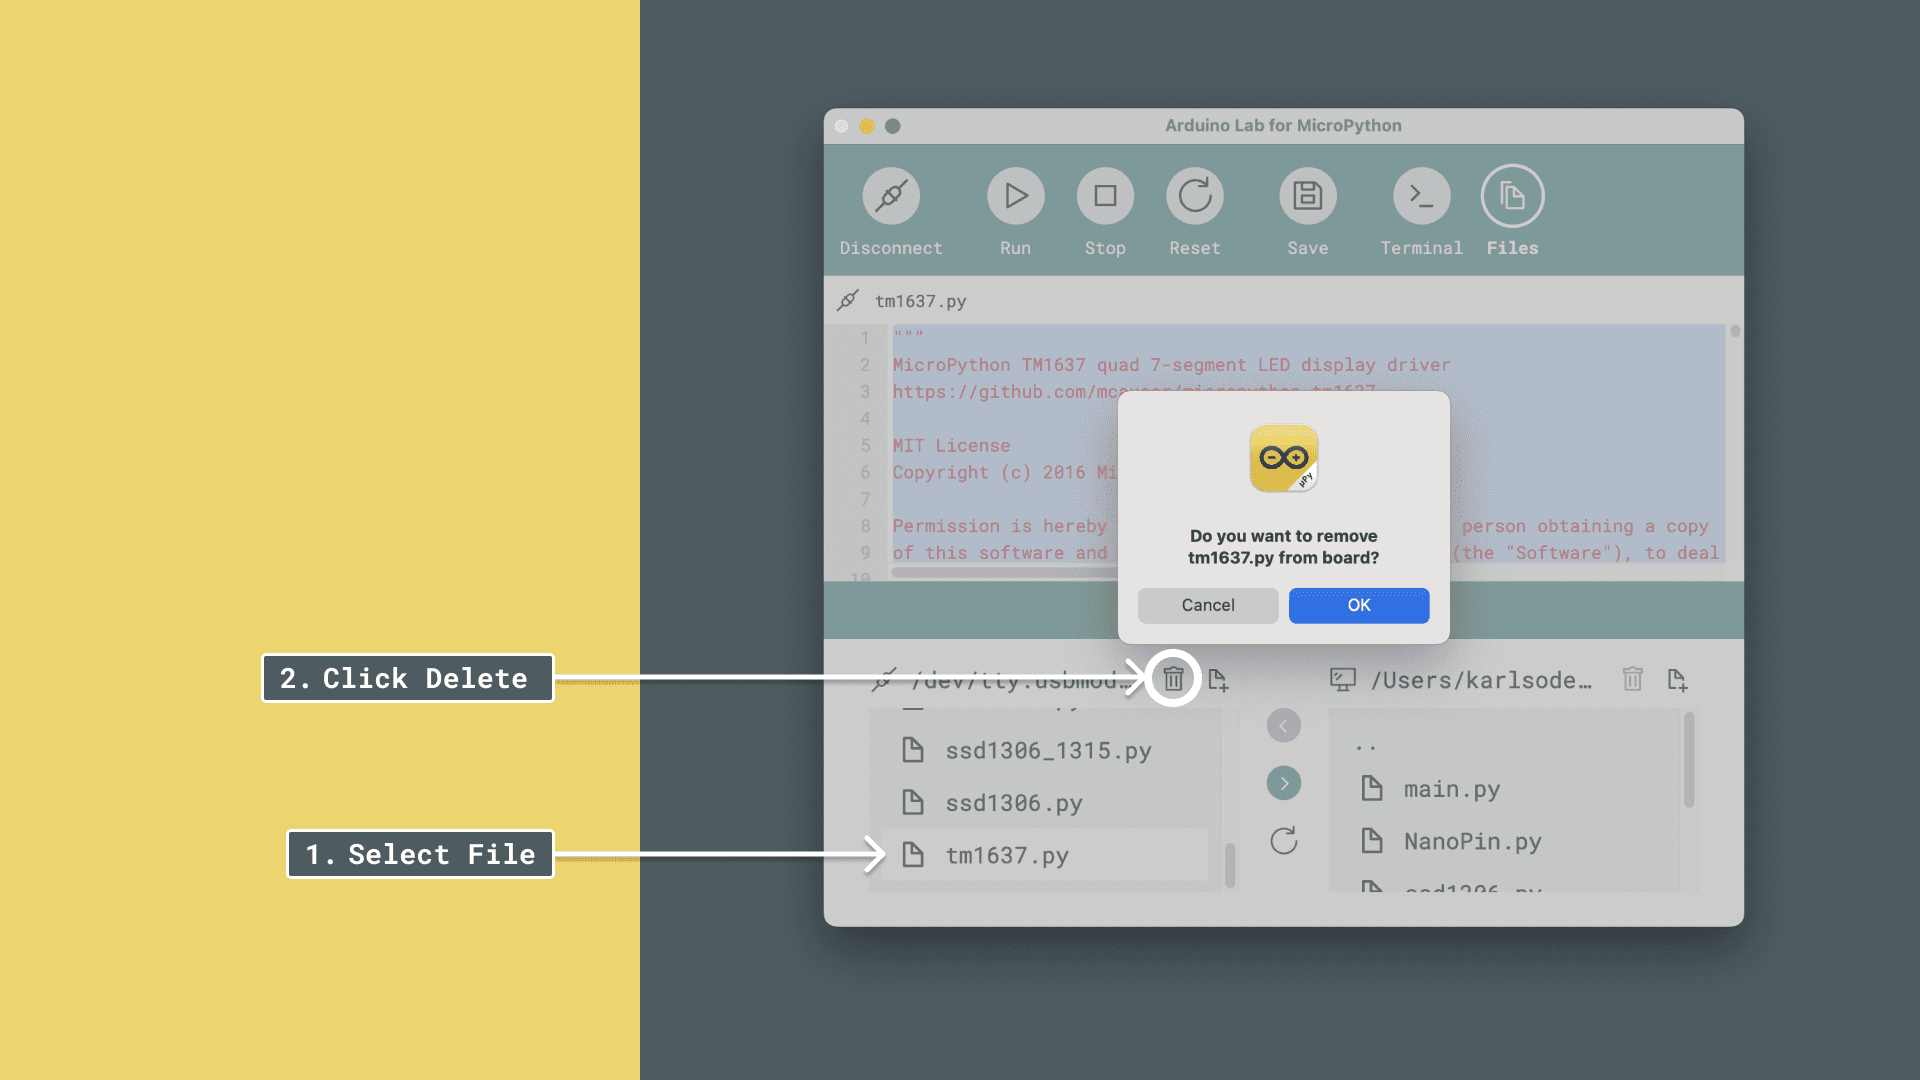
To delete a file from your board, open the Arduino Lab for MicroPython editor, connect to your board, and click the "File" button. This will open your local files as well as your board's files.
If you want to remove a file, simply mark it and click on the trashcan icon in the top right of the file window, as the image below shows:
Suggest changes
The content on docs.arduino.cc is facilitated through a public GitHub repository. If you see anything wrong, you can edit this page here.
License
The Arduino documentation is licensed under the Creative Commons Attribution-Share Alike 4.0 license.