First Configuration with MKR FOX 1200
Learn how to configure the MKR FOX 1200 to work with the SigFox network.
This example for a MKR FOX 1200 device allows you to setup the SigFox's backend for your board.
Hardware Required
- MKR FOX 1200
- Antenna (link to store)
Circuit
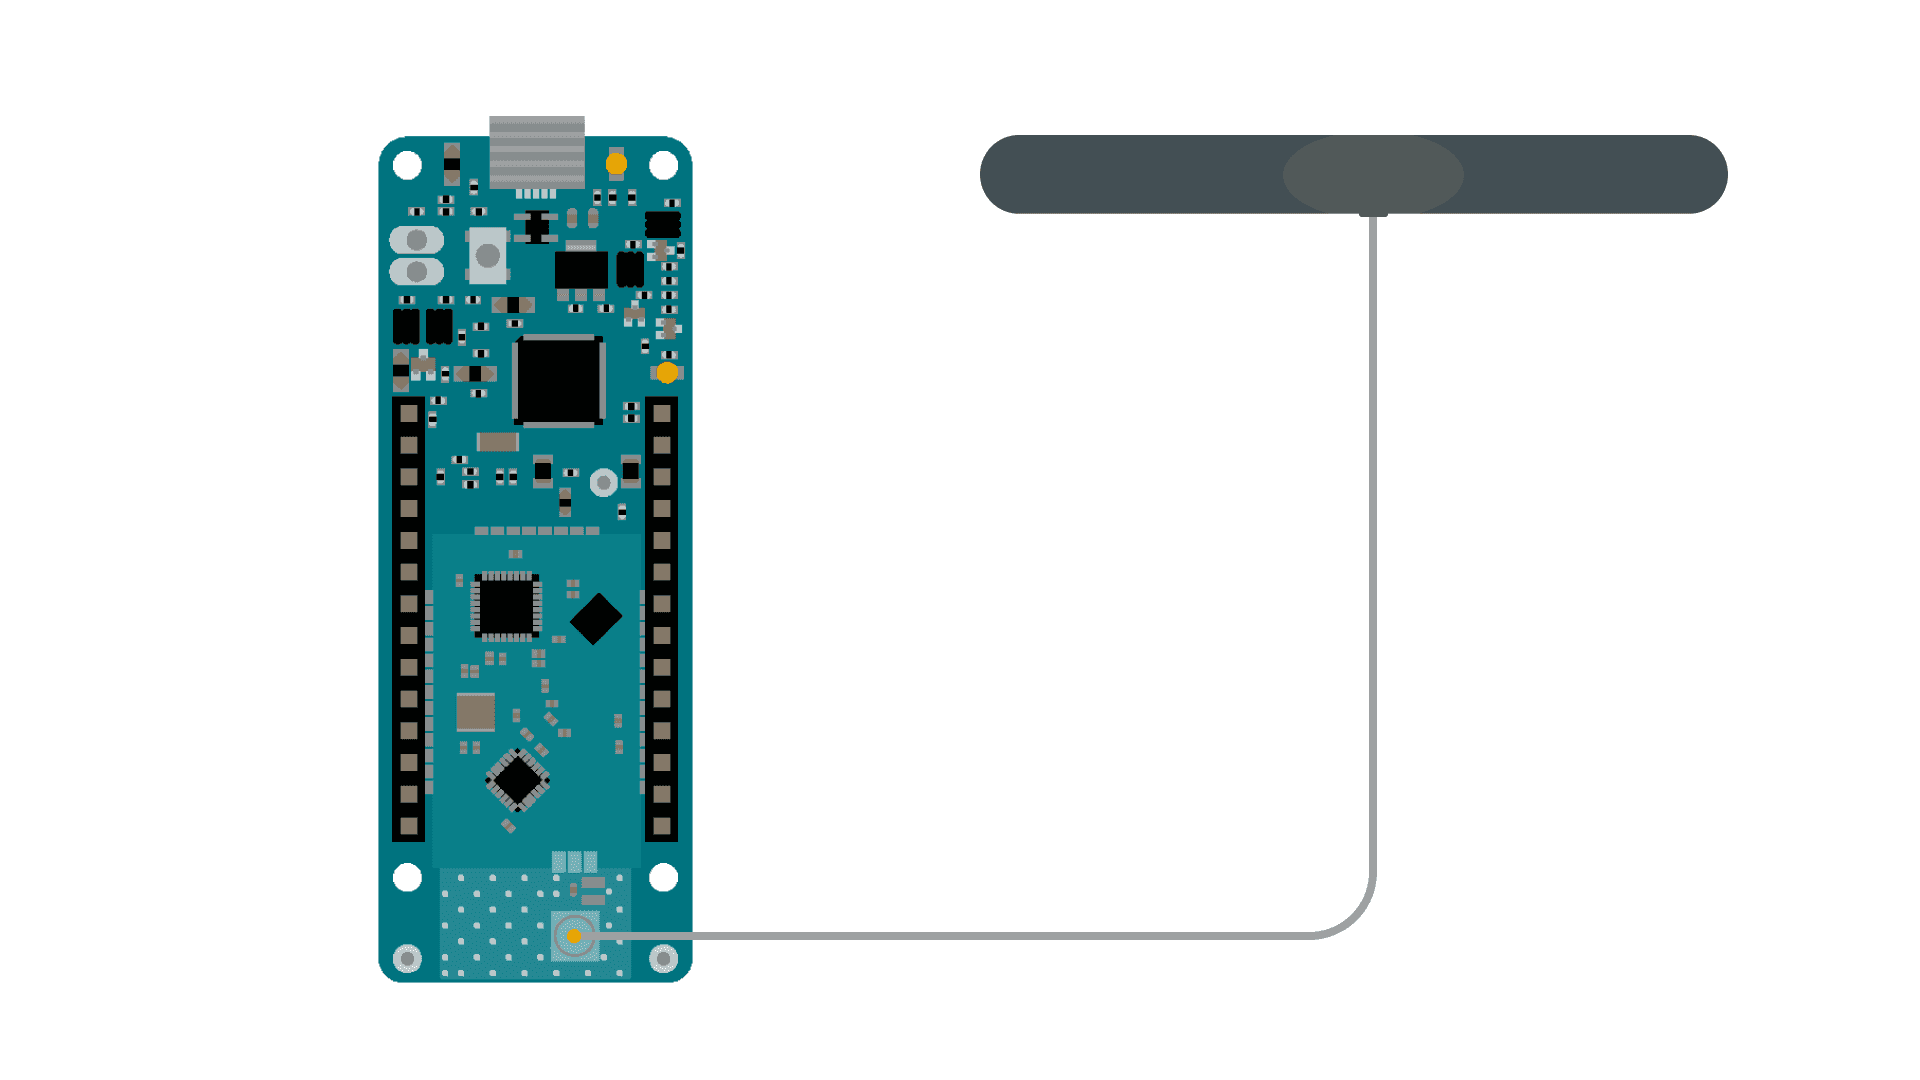
Connect the antenna to the MKR FOX 1200 board as shown in the image below.
Code
In
setup()1void setup() {2
3 Serial.begin(9600);4
5 while(!Serial) {};6
7 if (!SigFox.begin()) {8
9 Serial.println("Shield error or not present!");10
11 return;12}After this, we can read our ID and PAC that you have to use to register your board.
1String version = SigFox.SigVersion();2
3 String ID = SigFox.ID();4
5 String PAC = SigFox.PAC();6
7 // Display module information8
9 Serial.println("MKRFox1200 Sigfox first configuration");10
11 Serial.println("SigFox FW version " + version);12
13 Serial.println("ID = " + ID);14
15 Serial.println("PAC = " + PAC);16
17 Serial.println("");18
19 Serial.print("Module temperature: ");20
21 Serial.println(SigFox.temperatureInternal());22
23 Serial.println("Register your board on https://backend.sigfox.com/activate with provided ID and PAC");24
25 delay(100);26
27 // Send the module to the deepest sleep28
29 SigFox.end();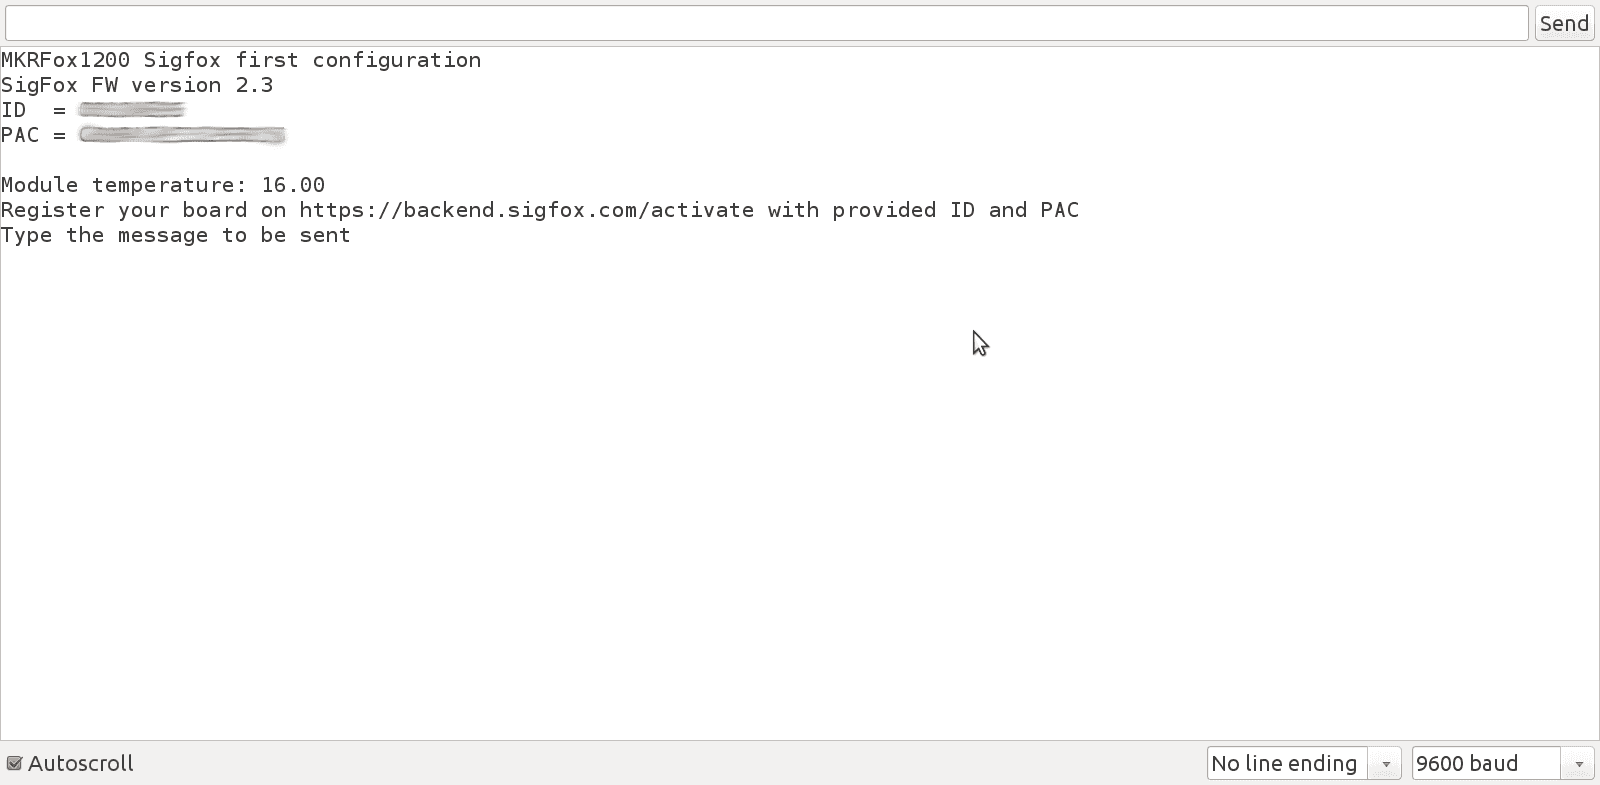
Register Your Board
To register you board you have to navigate to the SigFox backend. This is an one time registration process, needed once for every MKR FOX 1200 you own.
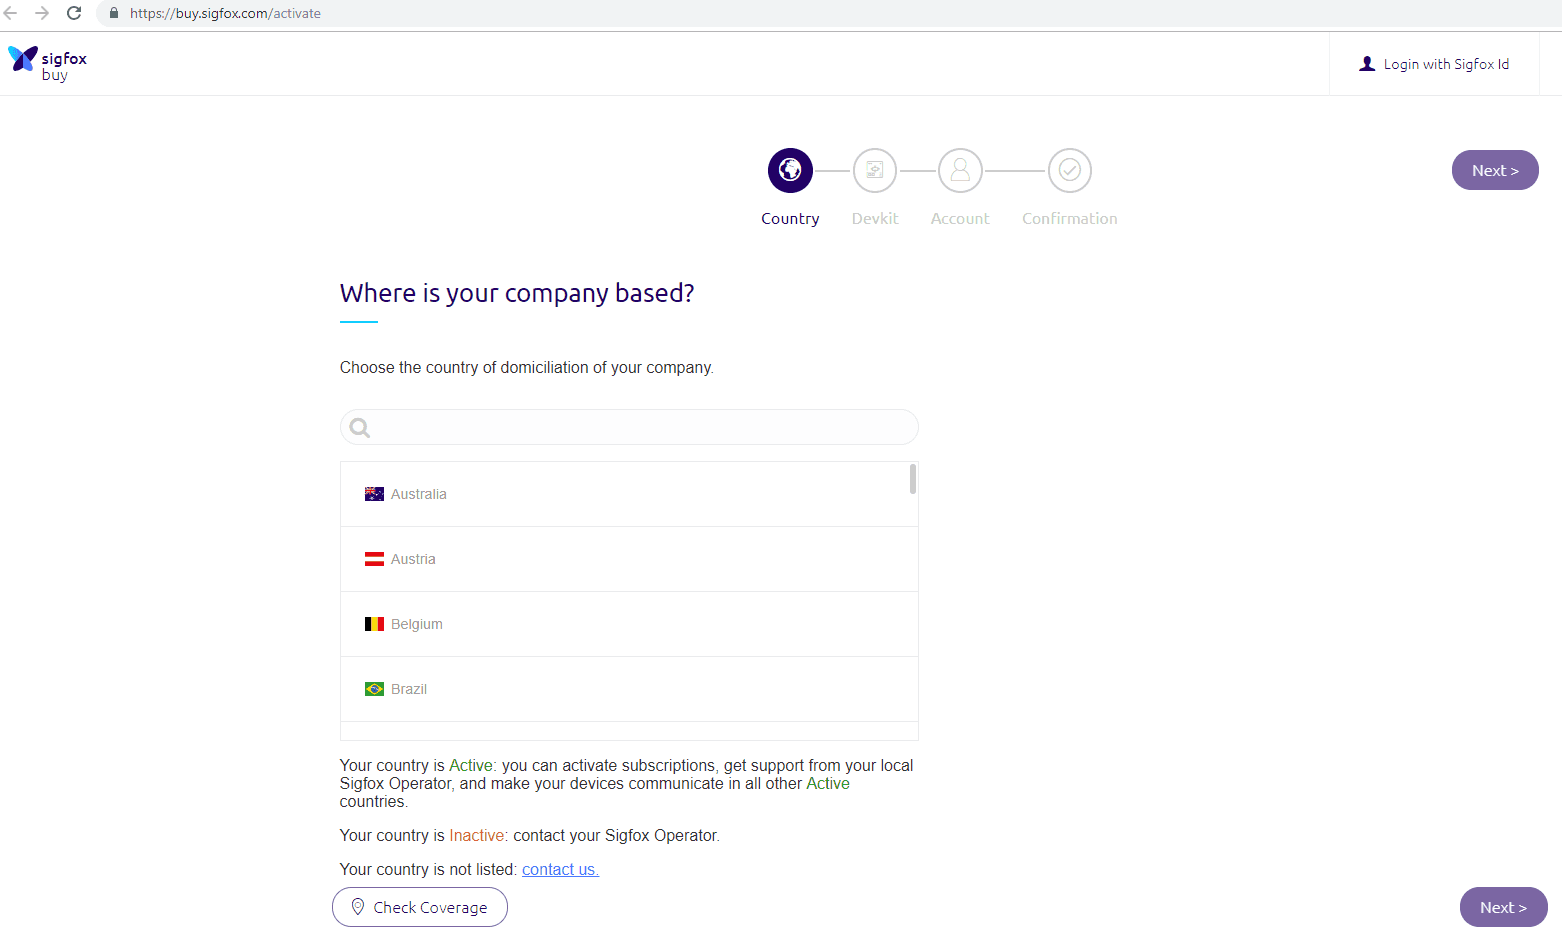
Select the country where the user is residing or using it right now
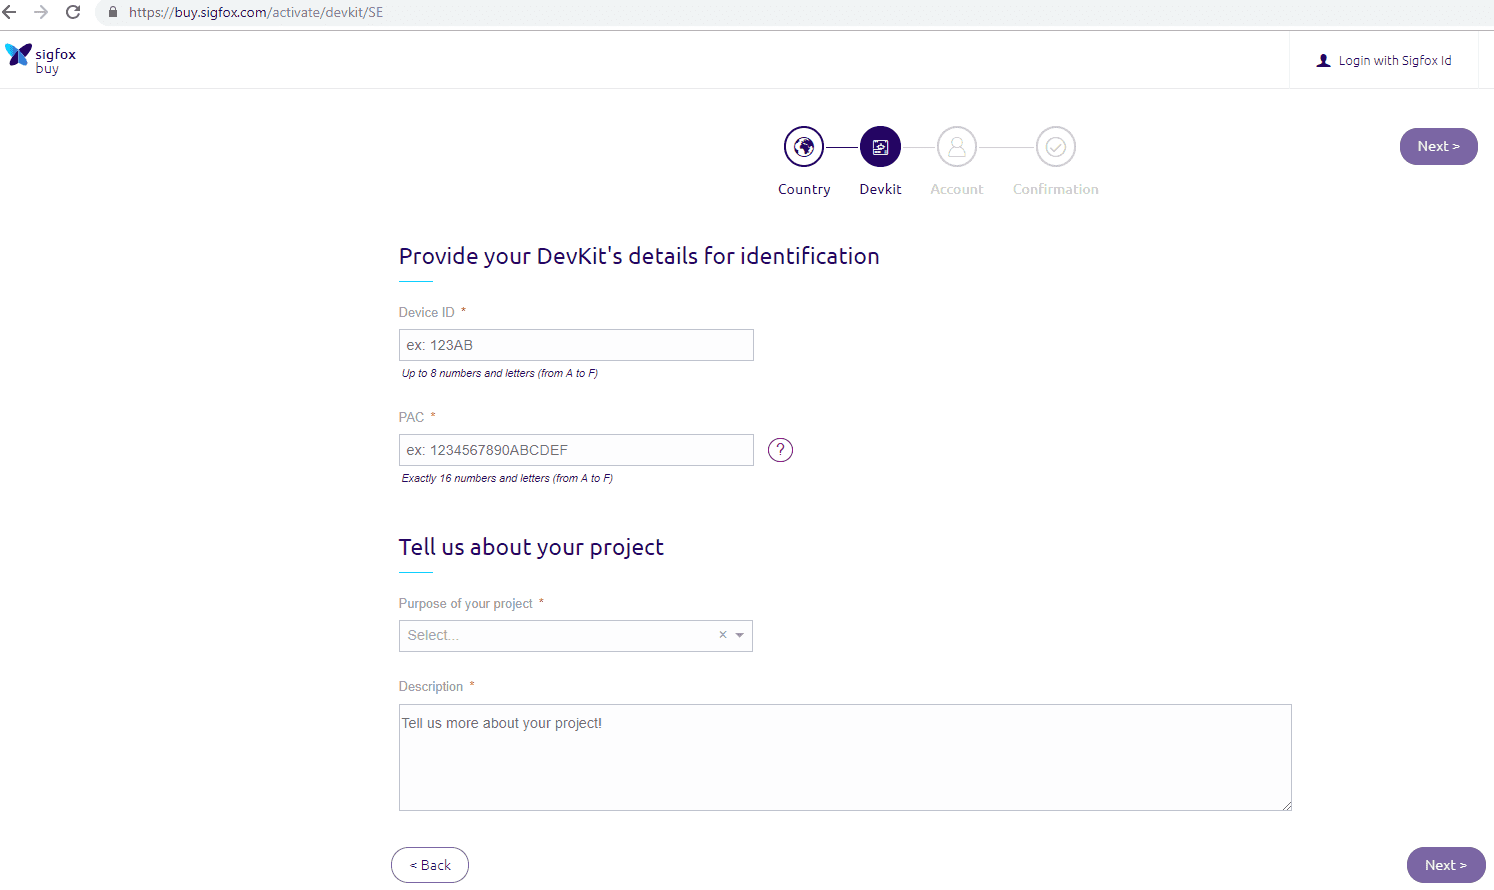
After that, enter your ID and PAC number which was shown on the serial monitor after uploading the sketch the FIRST CONFIG.
Now you can check the incoming and outgoing messages from the sigfox back end.
Input your credentials to get to the Sigfox portal home page.
Now we have to make sure that our Downlink mode is set to Direct and not Callback.
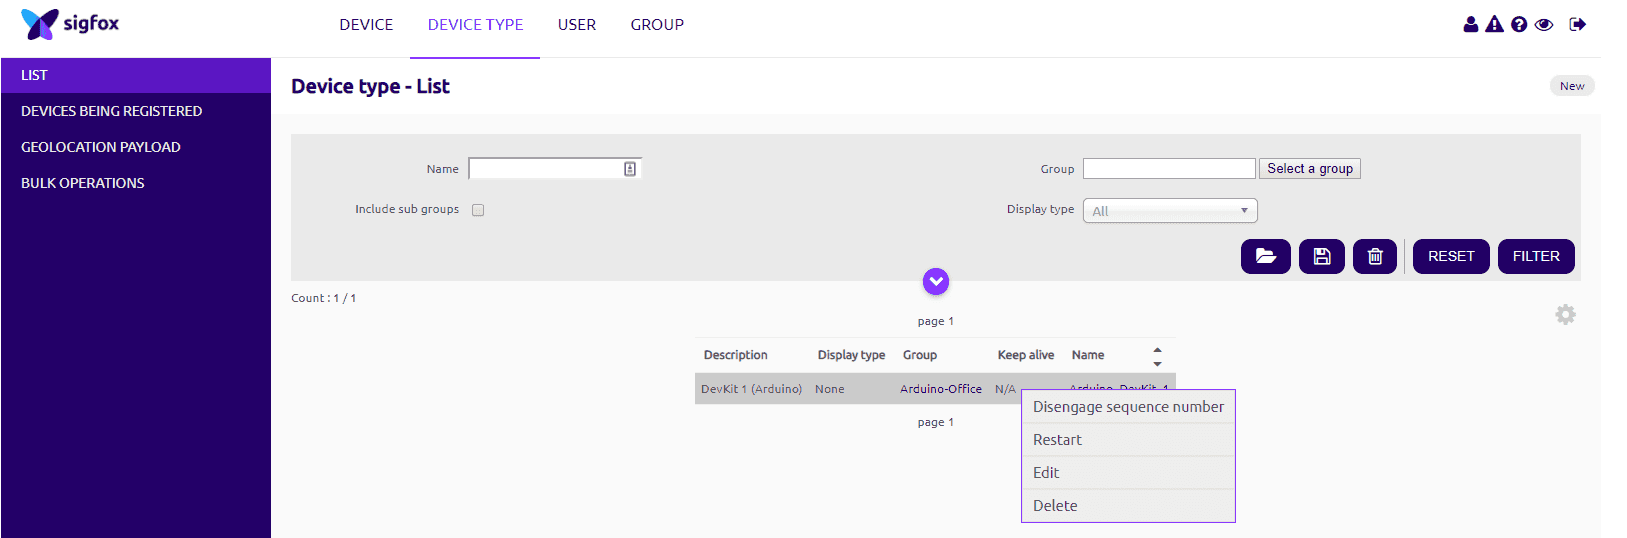
Click on the Device type and then click on the Keep Alive and click Edit.

So, put Downlink mode to Direct to receive messages back and forth.
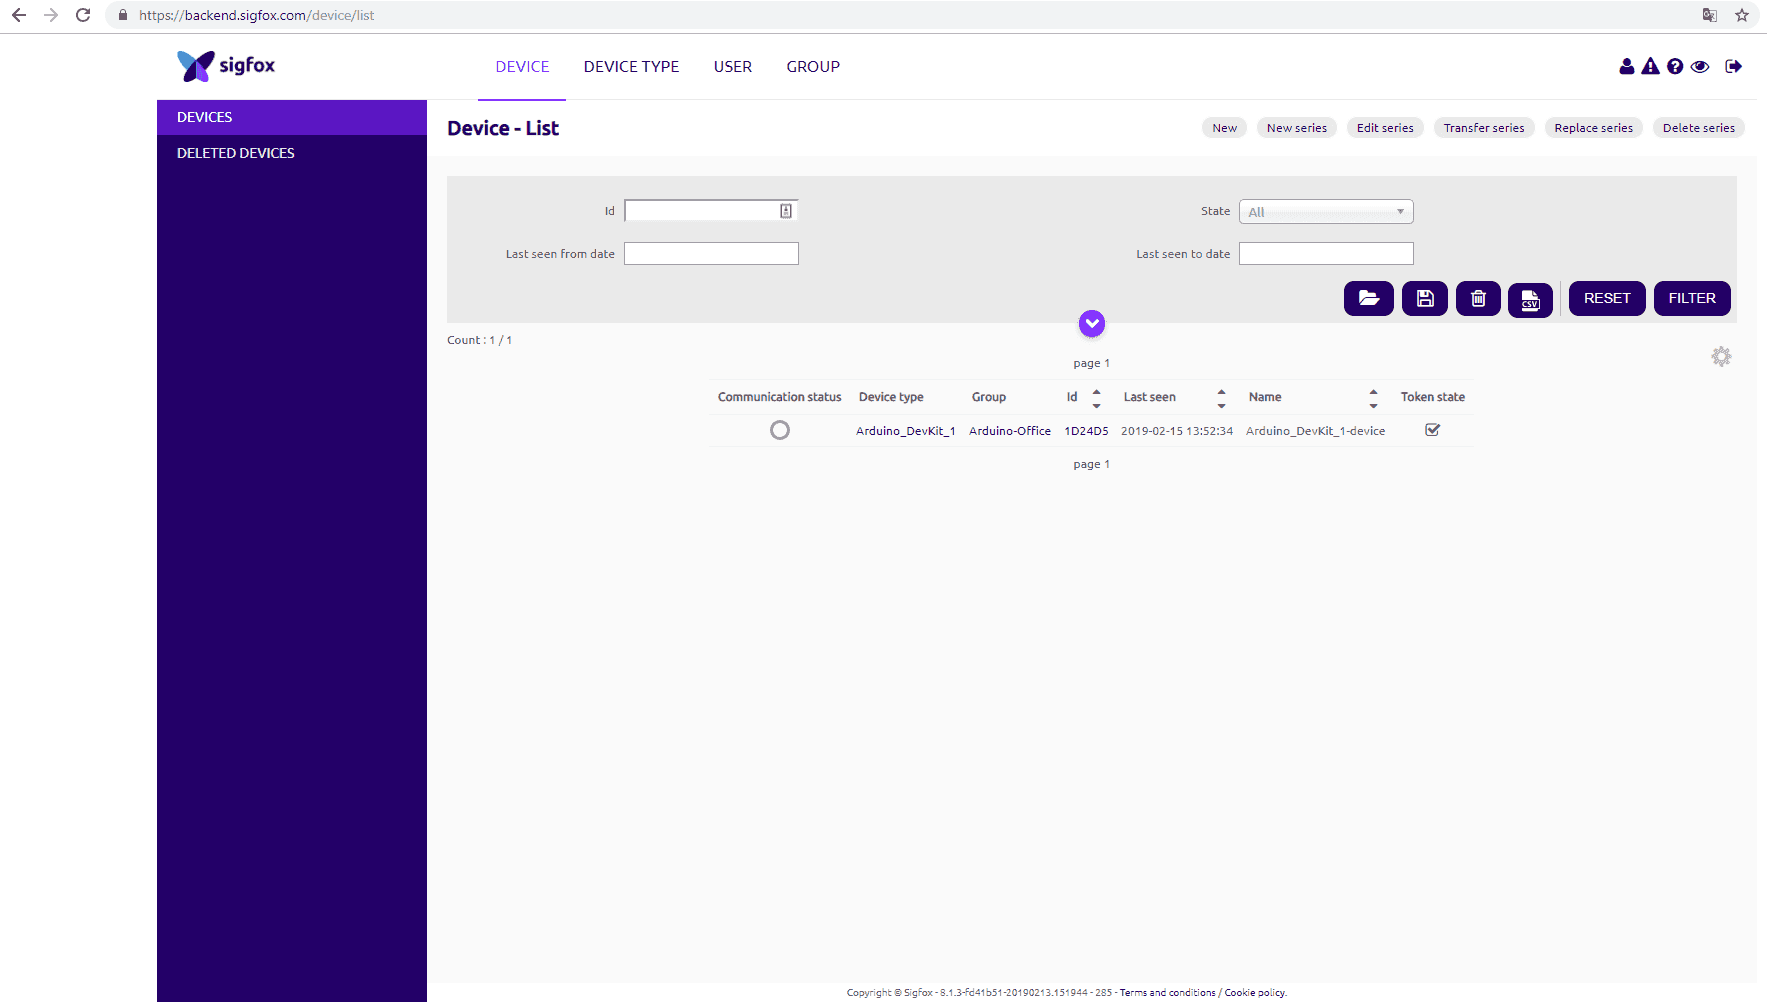
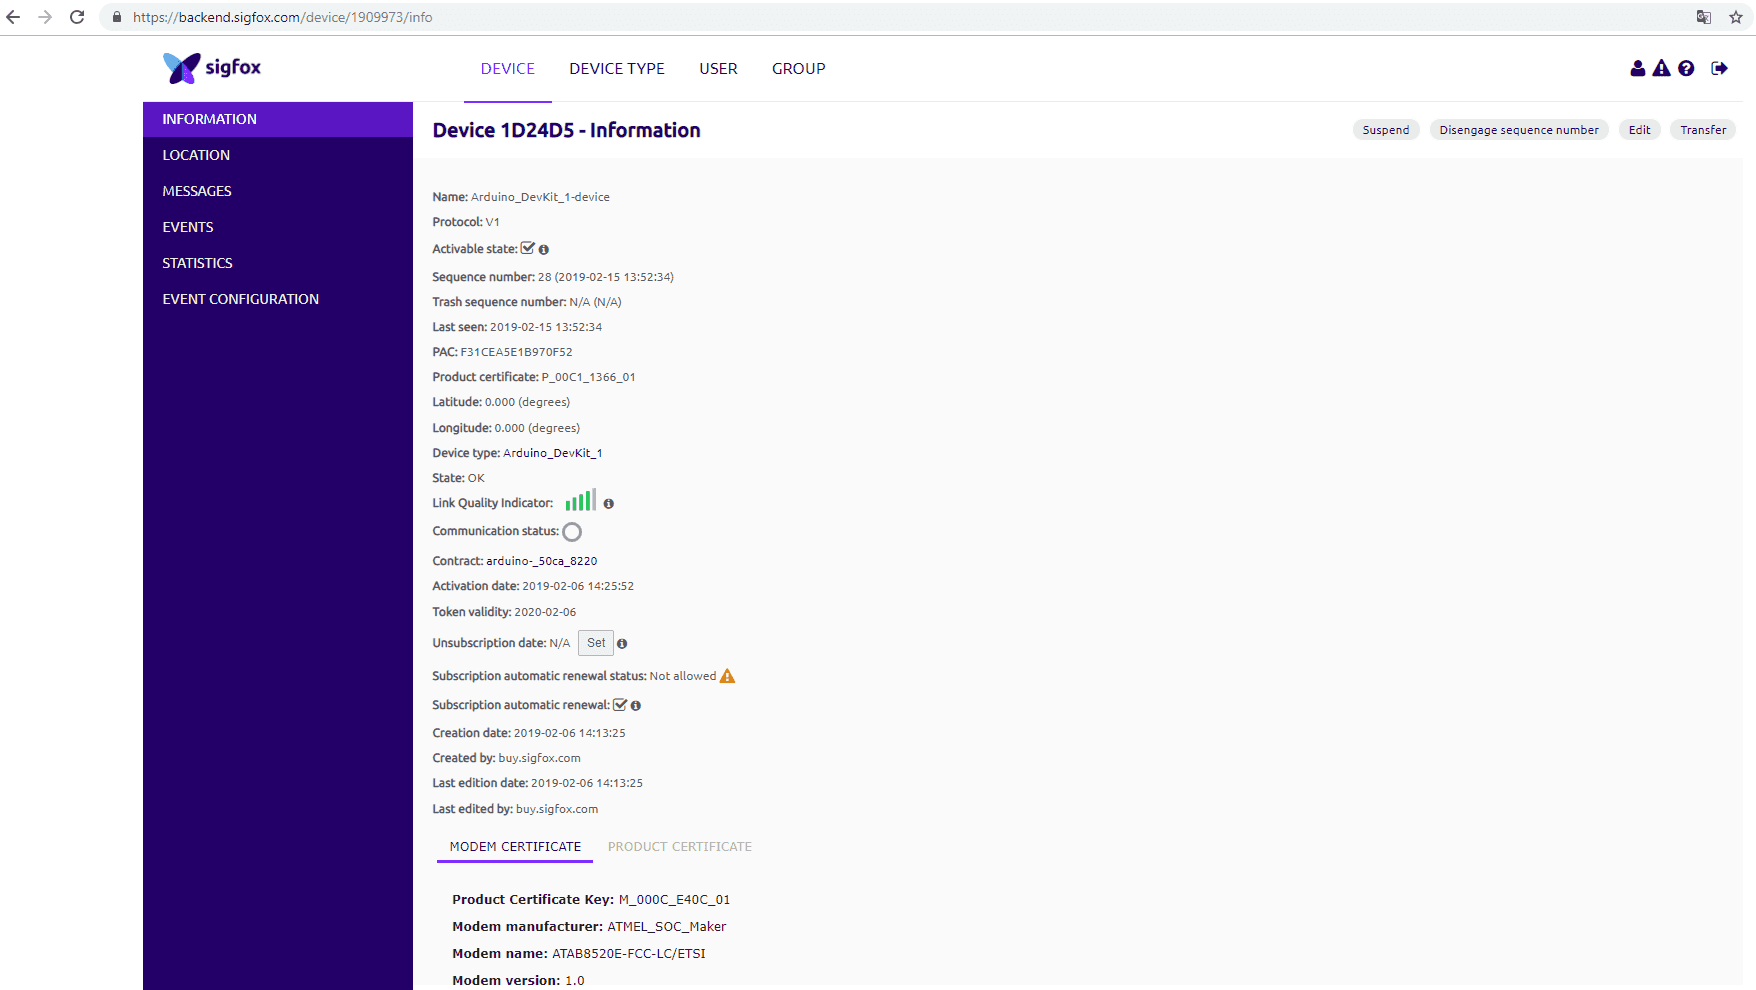
Now you can go back to the main Sigfox portal page and click on the Device on Top left, then click on the ID as shown in the image below.
Select the messages item on the left menu bar.
In this page you can see the messages. If it is sent properly, then you can see the green call back otherwise, you can see callback as a red arrow

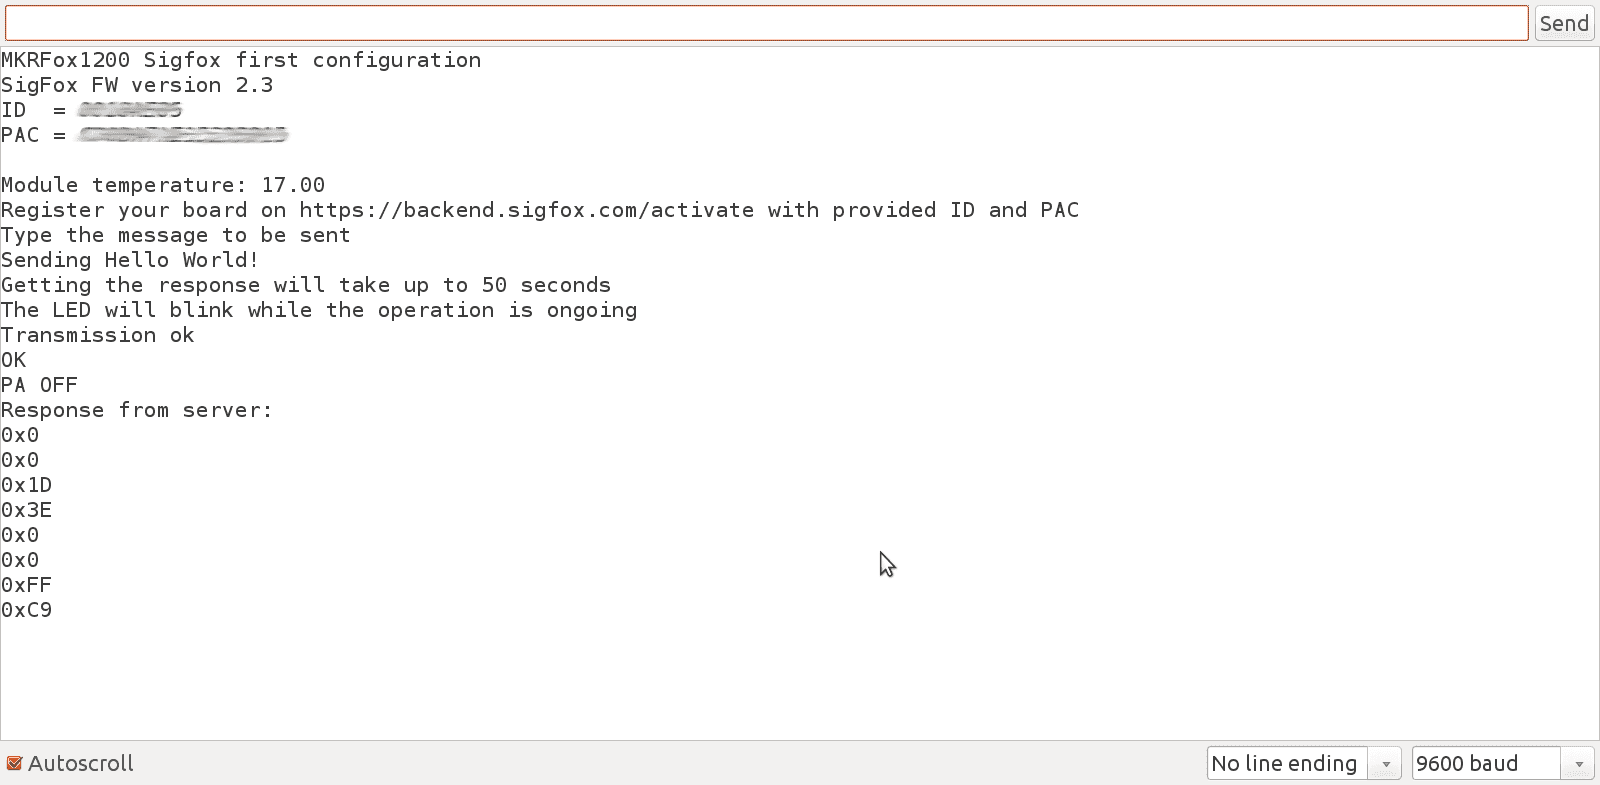
When the configuration for callback is done properly, you can send your first message! If your message is correctly delivered you will get a response from the server similar to:
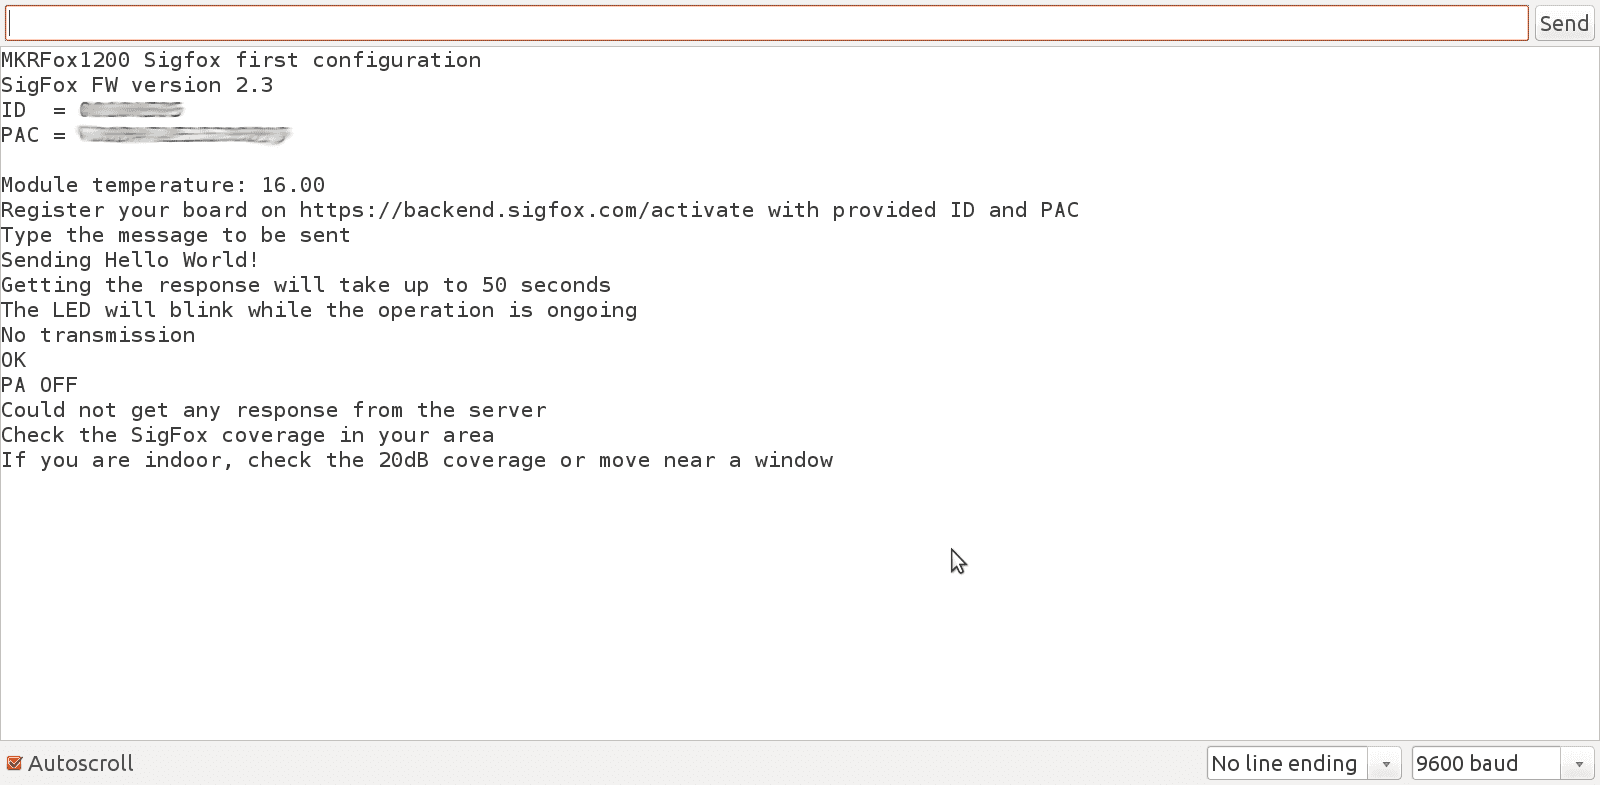
Otherwise an error message will be printed on the serial monitor
Complete Code
1/*2
3 SigFox First Configuration4
5 This sketch demonstrates the usage of MKRFox1200 SigFox module.6
7 Since the board is designed with low power in mind, it depends directly on ArduinoLowPower library8
9 This example code is in the public domain.10
11*/12
13#include <SigFox.h>14#include <ArduinoLowPower.h>15
16void setup() {17
18 Serial.begin(9600);19
20 while (!Serial) {};21
22 // Uncomment this line and comment begin() if you are working with a custom board23
24 //if (!SigFox.begin(SPI1, 30, 31, 33, 28, LED_BUILTIN)) {25
26 if (!SigFox.begin()) {27
28 Serial.println("Shield error or not present!");29
30 return;31
32 }33
34 // Enable debug led and disable automatic deep sleep35
36 // Comment this line when shipping your project :)37
38 SigFox.debug();39
40 String version = SigFox.SigVersion();41
42 String ID = SigFox.ID();43
44 String PAC = SigFox.PAC();45
46 // Display module information47
48 Serial.println("MKRFox1200 Sigfox first configuration");49
50 Serial.println("SigFox FW version " + version);51
52 Serial.println("ID = " + ID);53
54 Serial.println("PAC = " + PAC);55
56 Serial.println("");57
58 Serial.print("Module temperature: ");59
60 Serial.println(SigFox.internalTemperature());61
62 Serial.println("Register your board on https://buy.sigfox.com/activate with provided ID and PAC");63
64 Serial.println("/!\ The displayed PAC is the factory value. It is a throw-away value, which can only be used once for registration.")65
66 Serial.println("If this device has already been registered, you can retrieve the updated PAC value on https://backend.sigfox.com/device/list");67
68 Serial.println("Join the Sigfox Builders Slack community to exchange with other developers, get help .. and find new ideas! https://builders.iotagency.sigfox.com/");69
70 delay(100);71
72 // Send the module to the deepest sleep73
74 SigFox.end();75
76 Serial.println("Type the message to be sent");77
78 while (!Serial.available());79
80 String message;81
82 while (Serial.available()) {83
84 message += (char)Serial.read();85
86 }87
88 // Every SigFox packet cannot exceed 12 bytes89
90 // If the string is longer, only the first 12 bytes will be sent91
92 if (message.length() > 12) {93
94 Serial.println("Message too long, only first 12 bytes will be sent");95
96 }97
98 Serial.println("Sending " + message);99
100 // Remove EOL101
102 message.trim();103
104 // Example of message that can be sent105
106 // sendString(message);107
108 Serial.println("Getting the response will take up to 50 seconds");109
110 Serial.println("The LED will blink while the operation is ongoing");111
112 // Example of send and read response113
114 sendStringAndGetResponse(message);115}116
117void loop()118{119}120
121void sendString(String str) {122
123 // Start the module124
125 SigFox.begin();126
127 // Wait at least 30mS after first configuration (100mS before)128
129 delay(100);130
131 // Clears all pending interrupts132
133 SigFox.status();134
135 delay(1);136
137 SigFox.beginPacket();138
139 SigFox.print(str);140
141 int ret = SigFox.endPacket(); // send buffer to SIGFOX network142
143 if (ret > 0) {144
145 Serial.println("No transmission");146
147 } else {148
149 Serial.println("Transmission ok");150
151 }152
153 Serial.println(SigFox.status(SIGFOX));154
155 Serial.println(SigFox.status(ATMEL));156
157 SigFox.end();158}159
160void sendStringAndGetResponse(String str) {161
162 // Start the module163
164 SigFox.begin();165
166 // Wait at least 30mS after first configuration (100mS before)167
168 delay(100);169
170 // Clears all pending interrupts171
172 SigFox.status();173
174 delay(1);175
176 SigFox.beginPacket();177
178 SigFox.print(str);179
180 int ret = SigFox.endPacket(true); // send buffer to SIGFOX network and wait for a response181
182 if (ret > 0) {183
184 Serial.println("No transmission");185
186 } else {187
188 Serial.println("Transmission ok");189
190 }191
192 Serial.println(SigFox.status(SIGFOX));193
194 Serial.println(SigFox.status(ATMEL));195
196 if (SigFox.parsePacket()) {197
198 Serial.println("Response from server:");199
200 while (SigFox.available()) {201
202 Serial.print("0x");203
204 Serial.println(SigFox.read(), HEX);205
206 }207
208 } else {209
210 Serial.println("Could not get any response from the server");211
212 Serial.println("Check the SigFox coverage in your area");213
214 Serial.println("If you are indoor, check the 20dB coverage or move near a window");215
216 }217
218 Serial.println();219
220 SigFox.end();221}Conclusion
In this tutorial we have connected the MKR FOX 1200 board to the Sigfox network.
Suggest changes
The content on docs.arduino.cc is facilitated through a public GitHub repository. If you see anything wrong, you can edit this page here.
License
The Arduino documentation is licensed under the Creative Commons Attribution-Share Alike 4.0 license.