Guide to Arduino & Secure Digital (SD) Storage.
Browse through a series of examples on how to read and write to SD cards from an Arduino board.
This article was revised on 2021/11/18 by Karl Söderby.
This guide collects compatible hardware and great code examples that you can use if you want to get started with Secure Digital (SD) cards.
The examples in this guide comes from the SD Library, which originally is based on SdFat by William Greiman.
Hardware & Software Required
*The boards/shields that have an SD card slot are listed below:
- MKR Zero
- MKR IoT Carrier
- MKR MEM Shield
- MKR SD Proto Shield
- MKR ENV Shield
- MKR Ethernet Shield
- Arduino Education Shield
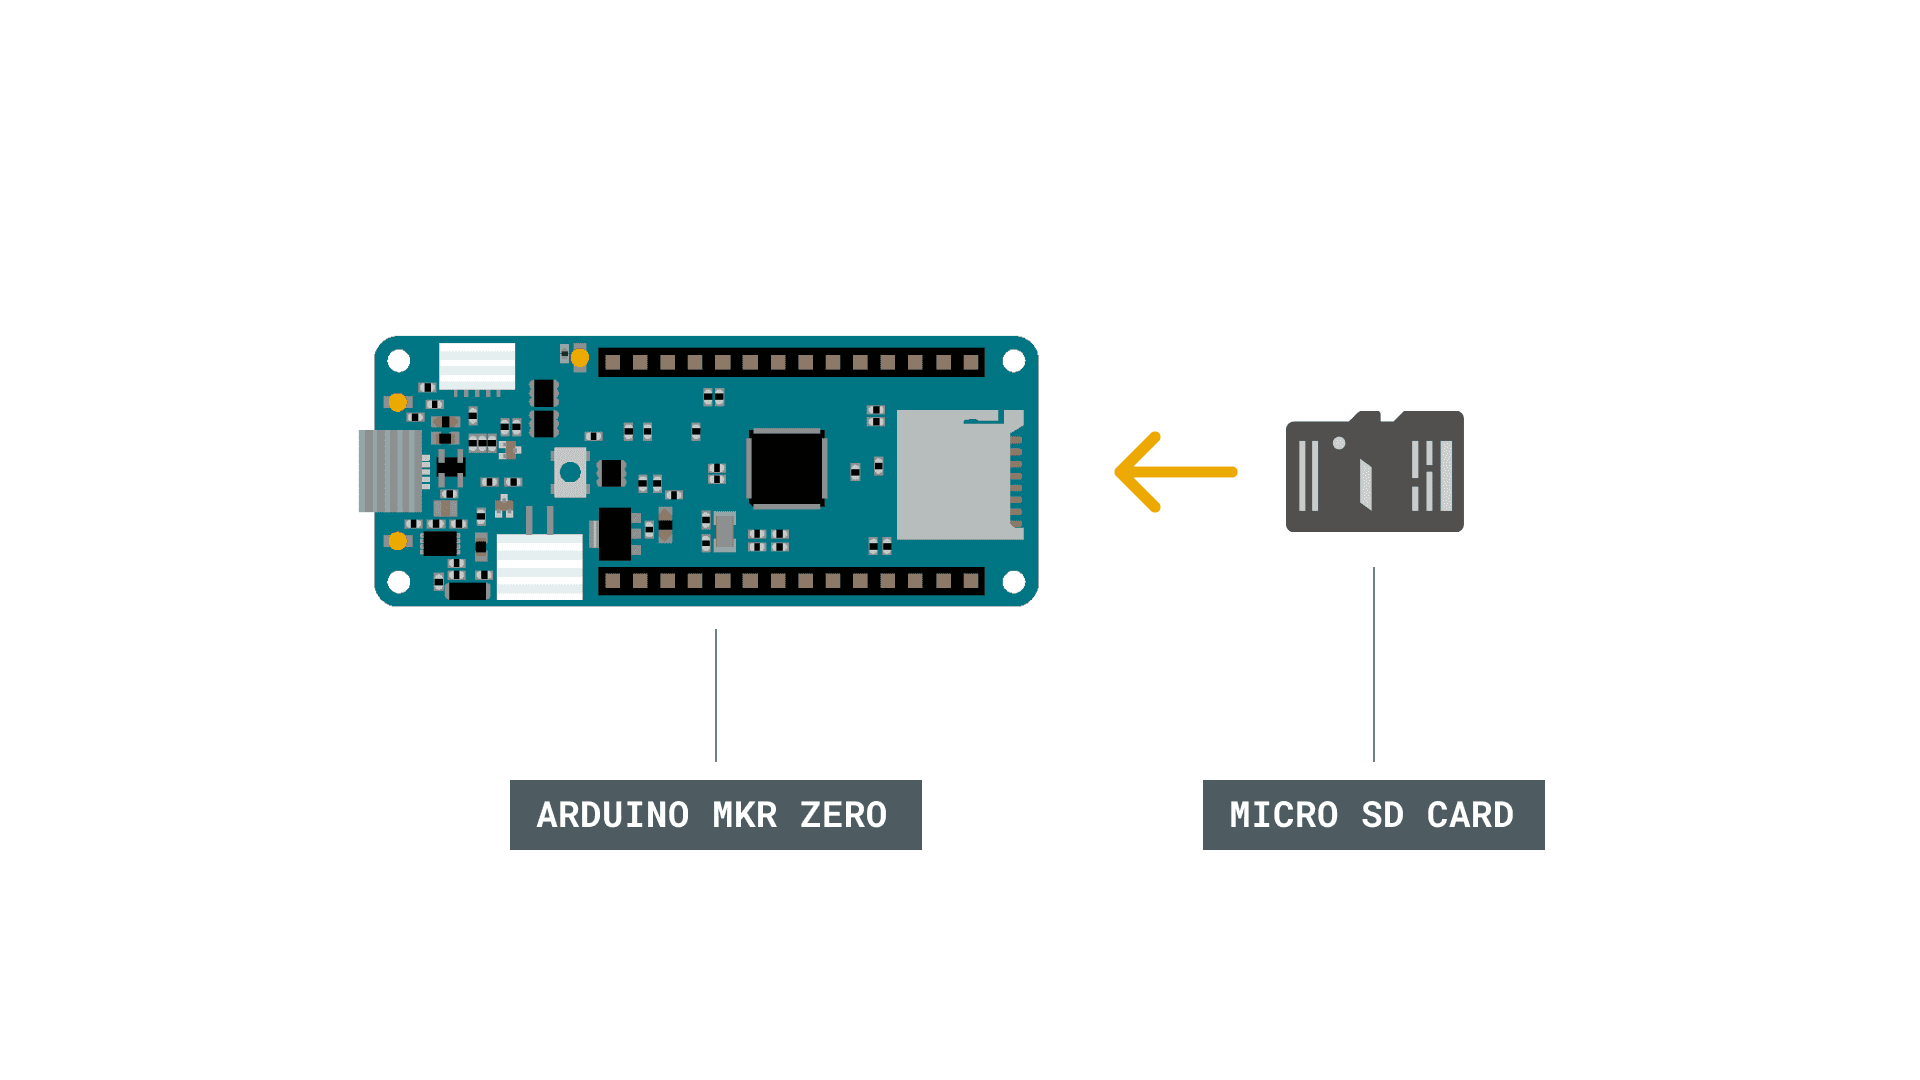
Circuit
Here is an example of how to insert an SD card into the MKR Zero board. None of the examples below requires any additional circuit.
Examples
Below are a series of examples
Read and Write
This example shows how to read and write data to and from an SD card.
- In
, create a new file withsetup()
named "test.txt".SD.open()
enables read and write access to the file, starting at the end. If a fileFILE_WRITE
was already on the card, that file would be opened."test.txt" - Name the instance of the opened file "myFile".
- Once opened, use
to write a string to the card, followed by a carriage return. Once the content is written, close the file.myFile.println() - Again, open the file with
. Once opened, ask the Arduino to read the contents of the file withSD.open()
and send them over the serial port. After all the contents of the file are read, close the file withSD.read()
.SD.close()
Note that pin 4 is default Chip Select (CS) pin for most boards. To set CS for MKR Zero, you can use 28 instead of 4, alt. use the SDCARD_SS_PIN definition.
1/*2 SD card read/write3
4 This example shows how to read and write data to and from an SD card file5 The circuit:6 SD card attached to SPI bus as follows:7 ** MOSI - pin 118 ** MISO - pin 129 ** CLK - pin 1310 ** CS - pin 4 (for MKRZero SD: SDCARD_SS_PIN)11
12 created Nov 201013 by David A. Mellis14 modified 9 Apr 201215 by Tom Igoe16
17 This example code is in the public domain.18
19*/20
21#include <SPI.h>22#include <SD.h>23
24File myFile;25
26void setup() {27 // Open serial communications and wait for port to open:28 Serial.begin(9600);29 while (!Serial) {30 ; // wait for serial port to connect. Needed for native USB port only31 }32
33
34 Serial.print("Initializing SD card...");35
36 if (!SD.begin(4)) {37 Serial.println("initialization failed!");38 while (1);39 }40 Serial.println("initialization done.");41
42 // open the file. note that only one file can be open at a time,43 // so you have to close this one before opening another.44 myFile = SD.open("test.txt", FILE_WRITE);45
46 // if the file opened okay, write to it:47 if (myFile) {48 Serial.print("Writing to test.txt...");49 myFile.println("testing 1, 2, 3.");50 // close the file:51 myFile.close();52 Serial.println("done.");53 } else {54 // if the file didn't open, print an error:55 Serial.println("error opening test.txt");56 }57
58 // re-open the file for reading:59 myFile = SD.open("test.txt");60 if (myFile) {61 Serial.println("test.txt:");62
63 // read from the file until there's nothing else in it:64 while (myFile.available()) {65 Serial.write(myFile.read());66 }67 // close the file:68 myFile.close();69 } else {70 // if the file didn't open, print an error:71 Serial.println("error opening test.txt");72 }73}74
75void loop() {76 // nothing happens after setup77}Card Information
This example shows how to read information about a SD card. The example reports volume type, free space and other information using the SD library, sending it over the serial port.
1/*2
3 SD card test4
5 This example shows how use the utility libraries on which the'6
7 SD library is based in order to get info about your SD card.8
9 Very useful for testing a card when you're not sure whether its working or not.10
11 Pin numbers reflect the default SPI pins for Uno and Nano models12
13 The circuit:14
15 SD card attached to SPI bus as follows:16
17 ** SDO - pin 11 on Arduino Uno/Duemilanove/Diecimila18
19 ** SDI - pin 12 on Arduino Uno/Duemilanove/Diecimila20
21 ** CLK - pin 13 on Arduino Uno/Duemilanove/Diecimila22
23 ** CS - depends on your SD card shield or module.24
25 Pin 10 used here for consistency with other Arduino examples26
27 created 28 Mar 201128
29 by Limor Fried30
31 modified 24 July 202032
33 by Tom Igoe34
35*/36// include the SD library:37#include <SPI.h>38#include <SD.h>39
40// set up variables using the SD utility library functions:41
42Sd2Card card;43
44SdVolume volume;45
46SdFile root;47
48// change this to match your SD shield or module;49// Default SPI on Uno and Nano: pin 1050// Arduino Ethernet shield: pin 451// Adafruit SD shields and modules: pin 1052// Sparkfun SD shield: pin 853// MKRZero SD: SDCARD_SS_PIN54
55const int chipSelect = 10;56
57void setup() {58
59 // Open serial communications and wait for port to open:60
61 Serial.begin(9600);62
63 while (!Serial) {64
65 ; // wait for serial port to connect. Needed for native USB port only66
67 }68
69 Serial.print("\nInitializing SD card...");70
71 // we'll use the initialization code from the utility libraries72
73 // since we're just testing if the card is working!74
75 if (!card.init(SPI_HALF_SPEED, chipSelect)) {76
77 Serial.println("initialization failed. Things to check:");78
79 Serial.println("* is a card inserted?");80
81 Serial.println("* is your wiring correct?");82
83 Serial.println("* did you change the chipSelect pin to match your shield or module?");84
85 while (1);86
87 } else {88
89 Serial.println("Wiring is correct and a card is present.");90
91 }92
93 // print the type of card94
95 Serial.println();96
97 Serial.print("Card type: ");98
99 switch (card.type()) {100
101 case SD_CARD_TYPE_SD1:102
103 Serial.println("SD1");104
105 break;106
107 case SD_CARD_TYPE_SD2:108
109 Serial.println("SD2");110
111 break;112
113 case SD_CARD_TYPE_SDHC:114
115 Serial.println("SDHC");116
117 break;118
119 default:120
121 Serial.println("Unknown");122
123 }124
125 // Now we will try to open the 'volume'/'partition' - it should be FAT16 or FAT32126
127 if (!volume.init(card)) {128
129 Serial.println("Could not find FAT16/FAT32 partition.\nMake sure you've formatted the card");130
131 while (1);132
133 }134
135 Serial.print("Clusters: ");136
137 Serial.println(volume.clusterCount());138
139 Serial.print("Blocks x Cluster: ");140
141 Serial.println(volume.blocksPerCluster());142
143 Serial.print("Total Blocks: ");144
145 Serial.println(volume.blocksPerCluster() * volume.clusterCount());146
147 Serial.println();148
149 // print the type and size of the first FAT-type volume150
151 uint32_t volumesize;152
153 Serial.print("Volume type is: FAT");154
155 Serial.println(volume.fatType(), DEC);156
157 volumesize = volume.blocksPerCluster(); // clusters are collections of blocks158
159 volumesize *= volume.clusterCount(); // we'll have a lot of clusters160
161 volumesize /= 2; // SD card blocks are always 512 bytes (2 blocks are 1KB)162
163 Serial.print("Volume size (Kb): ");164
165 Serial.println(volumesize);166
167 Serial.print("Volume size (Mb): ");168
169 volumesize /= 1024;170
171 Serial.println(volumesize);172
173 Serial.print("Volume size (Gb): ");174
175 Serial.println((float)volumesize / 1024.0);176
177 Serial.println("\nFiles found on the card (name, date and size in bytes): ");178
179 root.openRoot(volume);180
181 // list all files in the card with date and size182
183 root.ls(LS_R | LS_DATE | LS_SIZE);184
185 root.close();186}187
188void loop(void) {189}Please note: the cluster size is defined at format time by the user and has some default values that can be changed by users following some rules. In the sketch above we are using the default size for a block that is set at 512 bytes by standards. This value is not the cluster size: that is calculated as the number of blocks per cluster. You may find more in depth information about cluster sizes in this article.
Dump File
This example shows how to read a file from a SD card using the SD library and send it over the serial port.
On the SD card, there is a file named "datalog.txt". In the
loop()SD.open()Serial.print()SD.read()1/*2
3 SD card file dump4
5 This example shows how to read a file from the SD card using the6
7 SD library and send it over the serial port.8
9 Pin numbers reflect the default SPI pins for Uno and Nano models.10
11 The circuit:12
13 SD card attached to SPI bus as follows:14
15 ** SDO - pin 1116
17 ** SDI - pin 1218
19 ** CLK - pin 1320
21 ** CS - depends on your SD card shield or module.22
23 Pin 10 used here for consistency with other Arduino examples24
25 (for MKRZero SD: SDCARD_SS_PIN)26
27 created 22 December 201028
29 by Limor Fried30
31 modified 9 Apr 201232
33 by Tom Igoe34
35 This example code is in the public domain.36
37*/38#include <SD.h>39
40const int chipSelect = 10;41
42void setup() {43
44 // Open serial communications and wait for port to open:45
46 Serial.begin(9600);47
48 // wait for Serial Monitor to connect. Needed for native USB port boards only:49
50 while (!Serial);51
52 Serial.print("Initializing SD card...");53
54 if (!SD.begin(chipSelect)) {55
56 Serial.println("initialization failed. Things to check:");57
58 Serial.println("1. is a card inserted?");59
60 Serial.println("2. is your wiring correct?");61
62 Serial.println("3. did you change the chipSelect pin to match your shield or module?");63
64 Serial.println("Note: press reset or reopen this serial monitor after fixing your issue!");65
66 while (true);67
68 }69
70 Serial.println("initialization done.");71
72 // open the file. note that only one file can be open at a time,73
74 // so you have to close this one before opening another.75
76 File dataFile = SD.open("datalog.txt");77
78 // if the file is available, write to it:79
80 if (dataFile) {81
82 while (dataFile.available()) {83
84 Serial.write(dataFile.read());85
86 }87
88 dataFile.close();89
90 }91
92 // if the file isn't open, pop up an error:93
94 else {95
96 Serial.println("error opening datalog.txt");97
98 }99}100
101void loop() {102}File Management
This example shows how to create and destroy a file on a SD card.
In the
setup()SD.open()FILE_WRITEmyFile.close()After checking to make sure the file exists with
SD.exists()SD.remove1/*2
3 SD card basic file example4
5 This example shows how to create and destroy an SD card file6
7 The circuit. Pin numbers reflect the default8
9 SPI pins for Uno and Nano models:10
11 SD card attached to SPI bus as follows:12
13 ** SDO - pin 1114
15 ** SDI - pin 1216
17 ** CLK - pin 1318
19 ** CS - depends on your SD card shield or module.20
21 Pin 10 used here for consistency with other Arduino examples22
23 (for MKRZero SD: SDCARD_SS_PIN)24
25 created Nov 201026
27 by David A. Mellis28
29 modified 24 July 202030
31 by Tom Igoe32
33 This example code is in the public domain.34
35*/36#include <SD.h>37
38const int chipSelect = 10;39
40File myFile;41
42void setup() {43
44 // Open serial communications and wait for port to open:45
46 Serial.begin(9600);47
48 // wait for Serial Monitor to connect. Needed for native USB port boards only:49while (!Serial);50
51 Serial.print("Initializing SD card...");52
53 if (!SD.begin(10)) {54
55 Serial.println("initialization failed!");56
57 while (1);58
59 }60
61 Serial.println("initialization done.");62
63 if (SD.exists("example.txt")) {64
65 Serial.println("example.txt exists.");66
67 } else {68
69 Serial.println("example.txt doesn't exist.");70
71 }72
73 // open a new file and immediately close it:74
75 Serial.println("Creating example.txt...");76
77 myFile = SD.open("example.txt", FILE_WRITE);78
79 myFile.close();80
81 // Check to see if the file exists:82
83 if (SD.exists("example.txt")) {84
85 Serial.println("example.txt exists.");86
87 } else {88
89 Serial.println("example.txt doesn't exist.");90
91 }92
93 // delete the file:94
95 Serial.println("Removing example.txt...");96
97 SD.remove("example.txt");98
99 if (SD.exists("example.txt")) {100
101 Serial.println("example.txt exists.");102
103 } else {104
105 Serial.println("example.txt doesn't exist.");106
107 }108}109
110void loop() {111
112 // nothing happens after setup finishes.113}List Files
This example shows how to list the files available in the directory of the SD card.
The main
loop()setup()The
printDirectory1/*2
3 Listfiles4
5 This example shows how print out the files in a6
7 directory on a SD card.Pin numbers reflect the default8
9 SPI pins for Uno and Nano models10
11 The circuit:12
13 SD card attached to SPI bus as follows:14
15 ** SDO - pin 1116
17 ** SDI - pin 1218
19 ** CLK - pin 1320
21 ** CS - depends on your SD card shield or module.22
23 Pin 10 used here for consistency with other Arduino examples24
25 (for MKRZero SD: SDCARD_SS_PIN)26
27 created Nov 201028
29 by David A. Mellis30
31 modified 9 Apr 201232
33 by Tom Igoe34
35 modified 2 Feb 201436
37 by Scott Fitzgerald38
39 modified 24 July 202040
41 by Tom Igoe42
43
44
45 This example code is in the public domain.46
47*/48#include <SD.h>49
50const int chipSelect = 10;51
52File root;53
54void setup() {55
56 // Open serial communications and wait for port to open:57
58 Serial.begin(9600);59
60 // wait for Serial Monitor to connect. Needed for native USB port boards only:61
62 while (!Serial);63
64 Serial.print("Initializing SD card...");65
66 if (!SD.begin(chipSelect)) {67
68 Serial.println("initialization failed. Things to check:");69
70 Serial.println("1. is a card inserted?");71
72 Serial.println("2. is your wiring correct?");73
74 Serial.println("3. did you change the chipSelect pin to match your shield or module?");75
76 Serial.println("Note: press reset or reopen this serial monitor after fixing your issue!");77
78 while (true);79
80 }81
82 Serial.println("initialization done.");83
84 root = SD.open("/");85
86 printDirectory(root, 0);87
88 Serial.println("done!");89}90
91void loop() {92
93 // nothing happens after setup finishes.94}95
96void printDirectory(File dir, int numTabs) {97
98 while (true) {99
100 File entry = dir.openNextFile();101
102 if (! entry) {103
104 // no more files105
106 break;107
108 }109
110 for (uint8_t i = 0; i < numTabs; i++) {111
112 Serial.print('\t');113
114 }115
116 Serial.print(entry.name());117
118 if (entry.isDirectory()) {119
120 Serial.println("/");121
122 printDirectory(entry, numTabs + 1);123
124 } else {125
126 // files have sizes, directories do not127
128 Serial.print("\t\t");129
130 Serial.println(entry.size(), DEC);131
132 }133
134 entry.close();135
136 }137}Suggest changes
The content on docs.arduino.cc is facilitated through a public GitHub repository. If you see anything wrong, you can edit this page here.
License
The Arduino documentation is licensed under the Creative Commons Attribution-Share Alike 4.0 license.