Arduino Cloud CLI
Get started with the Arduino Cloud CLI, a tool for the automation and mass-deployment of devices.
Introduction
The Arduino Cloud CLI is a tool developed to access features of the Arduino Cloud service from the terminal.
It can be used as an automation tool to:
- Clone existing Things & Dashboards (by extracting its template).
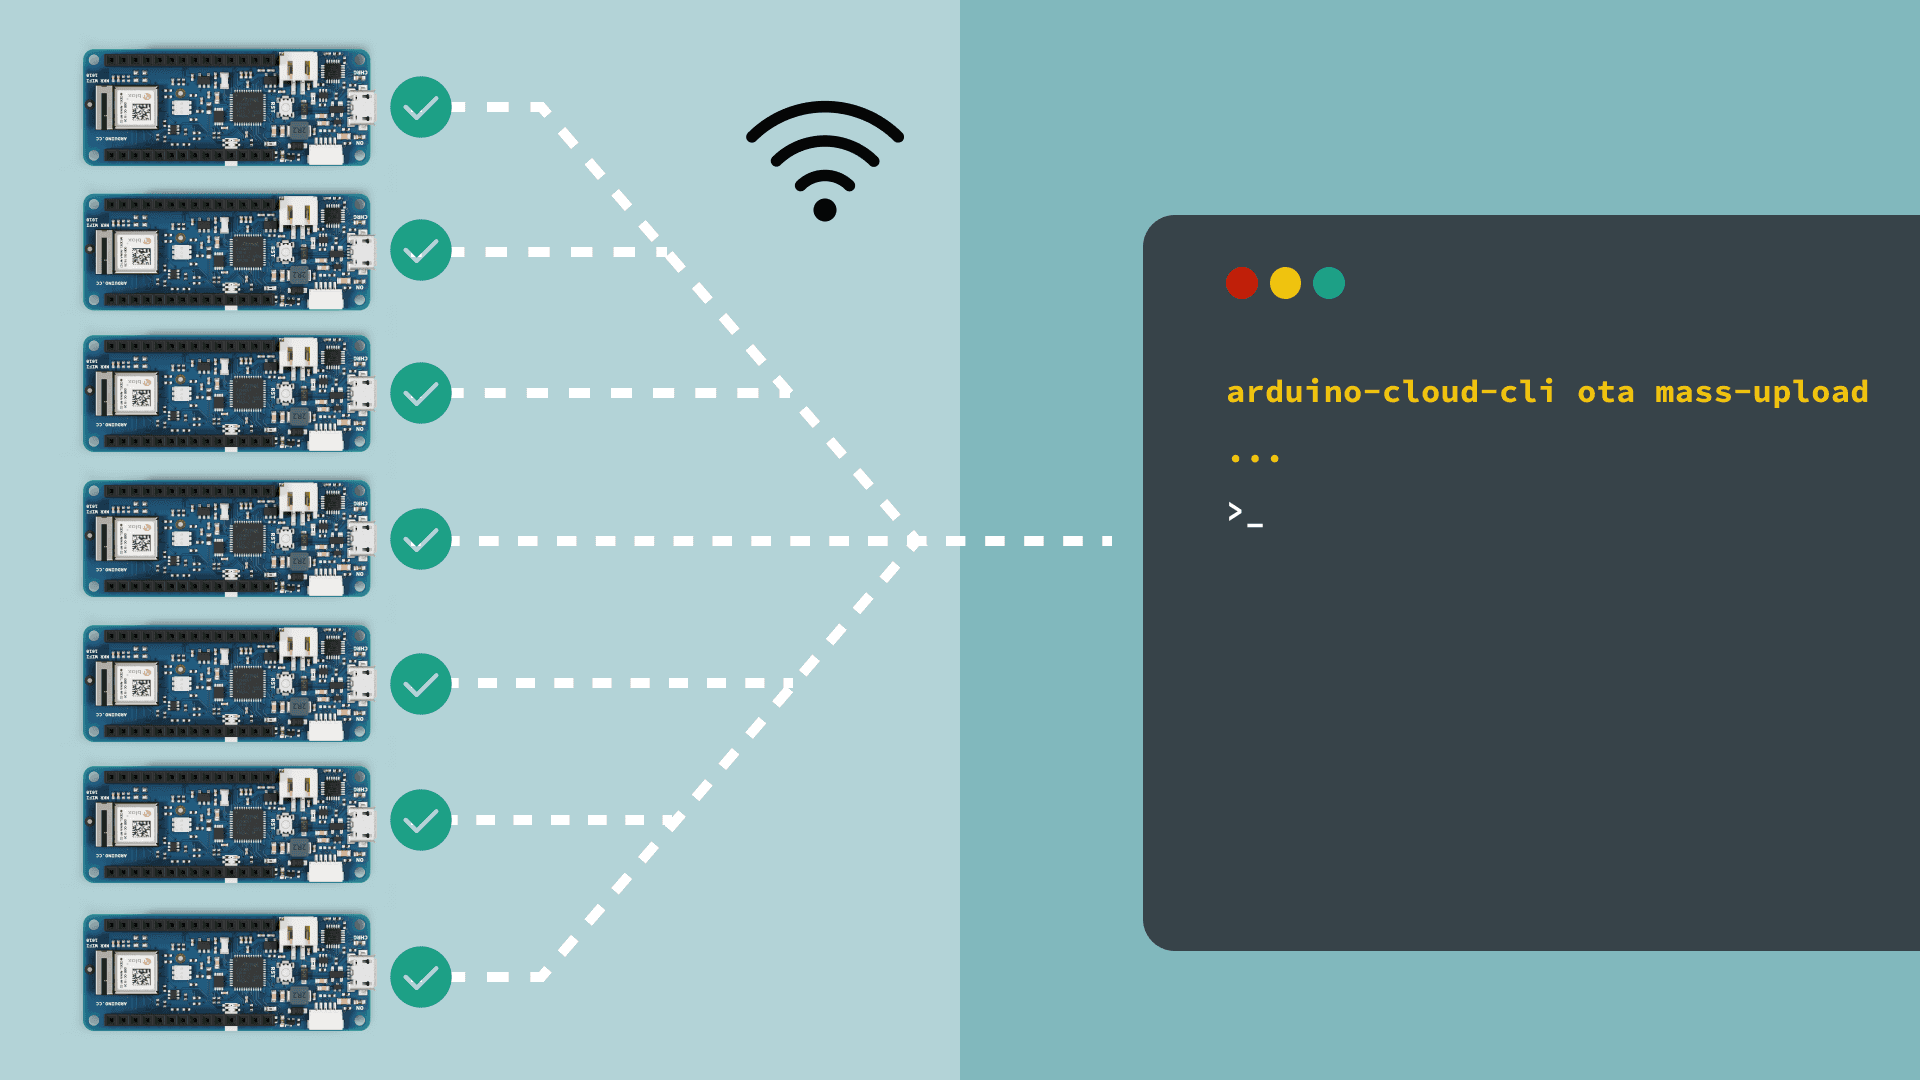
- Perform mass OTA uploads.
- Create devices, things, variables & dashboards directly via the CLI.
What is the Arduino Cloud CLI?
This tool was primarily designed to reduce time spent duplicating projects in the Arduino Cloud. Working with the CLI allows you to quickly make 10+ copies of a Thing, or update sketches on 50+ boards simultaneously.
An example of a workflow using this tool can be:
- Create your application using the Arduino Cloud web interface. Here you can configure your device, create variables, enter network credentials, edit your sketch and deploy your first project.
- With the Arduino Cloud CLI, extract templates of Things and dashboards you want to replicate.
- Provision a device with the
command and setup a Thing and dashboard using the templates previously extracted.device create - Download the sketch related to the Thing you extracted, and upload it to the device you created. This can also be done via the Arduino Cloud.
- Whenever an update is required for a fleet of devices, you can use the OTA mass-upload tool to update all of your devices at once, without being connected to your computer.
Let's for example say that you have created a "smart plug" setup, that includes 100 devices in a large building. The firmware running on the devices is not optimal, and needs an update.
With the Arduino Cloud CLI tool, you can not only automate the initial setup of these devices, but also be able to automate the maintenance sequence as well.
If you are new to the Arduino Cloud as well, you can follow the Getting Started guide.
Requirements
- Arduino account.
- Arduino Cloud CLI installed.
- A cloud compatible board*
*This is needed only for certain commands, like OTA uploads.
Installation
Download and extract the latest release. Make sure it is in your machine's PATH, so that it can be used globally.
After installation, check that it is working by opening a terminal, and type:
1arduino-cloud-cliOverview
The Arduino Cloud CLI has 5 main commands.
- credentials specific commands.credentials
- dashboard specific commands.dashboard
- device specific commandsdevice
- Over The Air uploads.ota
- Thing specific commands.thing
Each command has a set of subcommands which we will be exploring in this guide.
Credentials
arduino-cloud-cli credentials
Get your API key from the Arduino Cloud API Keys page
To authenticate with the Arduino Cloud, we will need to first set our credentials, using our
clientIdclientSecretTo authenticate, begin with:
1arduino-cloud-cli credentials initAnd enter your credentials.
This will create a
arduino-cloud-credentials.yamlTo overwrite, we can use:
1arduino-cloud-cli credentials init --overwriteIt is also possible to use
.json1arduino-cloud-cli credentials init --file-format jsonAs you may have multiple
arduino-cloud-credentials.yaml1arduino-cloud-cli credentials findDevice
arduino-cloud-cli device
To configure a device, you can use the following command:
1arduino-cloud-cli device create --name <deviceName> --port <port> --fqbn <deviceFqbn>Here's follows the FQBN's list of the supported devices:
Arduino Nano 33 IoTarduino:samd:nano_33_iot
Arduino MKR WiFi 1010arduino:samd:mkrwifi1010
Arduino Nano RP2040 Connectarduino:mbed_nano:nanorp2040connect
Arduino Portenta H7 / Arduino Portenta H7 Lite connected / Arduino Portenta Machine Controlarduino:mbed_portenta:envie_m7
Arduino Nicla Visionarduino:mbed_nicla:nicla_vision
Arduino MKR1000arduino:samd:mkr1000
Arduino MKR GSM 1400arduino:samd:mkrgsm1400
Arduino MKR NB 1500arduino:samd:mkrnb1500
LoRaWAN® Devices
To configure LoRaWAN® devices, use the additional
create-lora--frequency-plan1arduino-cloud-cli device create-lora --name <deviceName> --frequency-plan <freqID> --port <port> --fqbn <deviceFqbn>LoRaWAN® devices that are supported:
arduino:samd:mkrwan1310arduino:samd:mkrwan1300
To find out what frequency to use for
--frequency-plan1arduino-cloud-cli device list-frequency-plansGeneric Devices (ESP32 / ESP8266)
General devices is a virtual device that does not need to be attached to a physical board.
To see the full list of supported FQBNs (Fully Qualified Board Names), you can run the following command:
1arduino-cloud-cli device list-fqbnTo create a generic device, you can use the following command. Note that the
--fqbngeneric:generic:generic1arduino-cloud-cli device create-generic --name <deviceName> --fqbn <fqbn>Delete a Device
Devices can be deleted using the device delete command.
This command accepts two mutually exclusive flags:
--id--tags--id1arduino-cloud-cli device delete --id <deviceID>When
--tags1arduino-cloud-cli device delete --tags <key0>=<value0>,<key1>=<value1>List Devices
Devices currently present on Arduino Cloud can be retrieved with:
1arduino-cloud-cli device listIt has an optional
--tags1arduino-cloud-cli device list --tags <key0>=<value0>,<key1>=<value1>Tag Device
Add tags to a device. Tags should be passed as a comma-separated list of
<key>=<value>1arduino-cloud-cli device create-tags --id <deviceID> --tags <key0>=<value0>,<key1>=<value1>Untag Device
Deletes specific tags of a device. The keys of the tags to delete should be passed in a comma-separated list of strings:
1arduino-cloud-cli device delete-tags --id <deviceID> --keys <key0>,<key1>Things
arduino-cloud-cli things
Things in the Arduino Cloud is the virtual twin of your hardware device. In a Thing, you create variables, attach device and add network credentials.
With
arduino-cloud-cli
a template from existing Things, and output in a template file (extract
)..yaml
a Thing, based on a template.create
a Thing. This command simply duplicates a Thing.clone
a device to a Thing (attach it).bind
Extract Thing Template
Extract a template from an existing Thing.
The template is printed to stdout and its format depends on the global
--format1arduino-cloud-cli thing extract --id <thingID> --format <json|yaml>Create Things
Create a thing from a thing template.
Supported template formats are JSON and YAML. The name parameter is optional. If it is provided, then it overrides the name retrieved from the template:
1arduino-cloud-cli thing create --name <thingName> --template <template.(json|yaml)>Clone Things
To clone a Thing (duplicating it), we can use the
clone--name1arduino-cloud-cli thing clone --name <thingName> --clone-id <thingToCloneID>List Things
The
thing listTo display all Things with all variables, use:
1arduino-cloud-cli thing list --show-variablesTo print a list of specific Things, we can use the
--ids1arduino-cloud-cli thing list --ids <thingOneID>,<thingTwoID>Print out the Thing associated with a specific device.
1arduino-cloud-cli thing list --device-id <deviceID>Print only the things that have all the specified tags:
1arduino-cloud-cli thing list --tags <key0>=<value0>,<key1>=<value1>Delete Things
Things can be deleted using the thing delete command.
This command accepts two mutually exclusive flags:
--id--tags--id1arduino-cloud-cli thing delete --id <thingID>When
--tags1arduino-cloud-cli thing delete --tags <key0>=<value0>,<key1>=<value1>Bind Thing to Device
Binding a device is the same as "attaching" a device to a Thing.
To bind a Thing to an existing device:
1arduino-cloud-cli thing bind --id <thingID> --device-id <deviceID>Tag a Thing
Add tags to a Thing. Tags should be passed as a comma-separated list of
<key>=<value>1arduino-cloud-cli thing create-tags --id <thingID> --tags <key0>=<value0>,<key1>=<value1>Untag a Thing
Delete specific tags of a Thing. The keys of the tags to delete should be passed in a comma-separated list:
1arduino-cloud-cli thing delete-tags --id <thingID> --keys <key0>,<key1>Dashboard
arduino-cloud-cli dashboard
Dashboards are used to visualize and interact with data from your board. With the
arduino-cloud-cli
template from a dashboard and output in a template file (extract
)..yaml
a dashboard from a template file.create
Extract Dashboard Template
Extract a template from an existing dashboard. The template is printed to stdout and its format depends on the global
--format1arduino-cloud-cli dashboard extract --id <dashboardID> --format <json|yaml>List Dashboards
Print a list of available dashboards and their widgets by using this command:
1arduino-cloud-cli dashboard list --show-widgetsDelete Dashboards
Delete a dashboard with the following command:
1arduino-cloud-cli dashboard delete --id <dashboardID>Create Dashboard
Dashboards can only be created from a template. Supported dashboard template formats are
.json.yaml--nameThe
--overridething_id1arduino-cloud-cli dashboard create 2--name <dashboardName> 3--template <template.(json|yaml)> 4--override <thing-0>=<actualThingID-0>,5<thing-1>=<actualThingID-1>Note that the
dashboard create--override
is the Thing name you have in a template file that you have obtained using "dashboard extract". Note that in the command provided above, you can create a dashboard from more than one Thing.<thing-0>
is the Thing ID, which is something like<actualThingID-0>8121w624-9d23-425f-6420-13e46214917b
OTA (Over-The-Air)
arduino-cloud-cli ota
OTA (Over-The-Air) is the process of upgrading the firmware remotely.
With the
arduino-cloud-cli
sketches to a board remotely.upload
sketches to several boards simultaneously, also remotely.mass-upload- Schedule a preferred time (up to one week in advance) for an upload to happen, by using the
flag.--deferred
Upload
To upload a sketch, you will need to specify the
--device-id--file1arduino-cloud-cli ota upload --device-id <deviceID> --file <sketch-file.ino.bin>Note that this is not your
file, but a binary file that you will need to generate. You will find instructions further down this document on how to do this..ino
Deferred Upload
The default OTA upload should complete in 10 minutes. Use
--deferred1arduino-cloud-cli ota upload --device-id <deviceID> --file <sketch-file.ino.bin> --deferredMass Upload
It is also possible to perform a mass ota upload through a specific command. The fqbn is mandatory.
To upload using a device
1arduino-cloud-cli ota mass-upload --fqbn <deviceFQBN> --device-ids <deviceIDs> --file <sketch-file.ino.bin>You can also specify by using
device-tags1arduino-cloud-cli ota mass-upload --fqbn <deviceFQBN> --device-tags <key0>=<value0>,<key1>=<value1> --file <sketch-file.ino.bin>Compile Sketches (.bin)
When uploading a sketch using OTA, you will need to compile the binary file (
.binarduino-cloud-cliCompile with Arduino CLI
Using
arduino-cli1arduino-cli compile -b arduino:samd:mkrwifi1010 /home/user/Arduino/MySketchYou can find out your board's FQBN by running
, a command that lists all boards and their corresponding FQBN.arduino-cli board listall
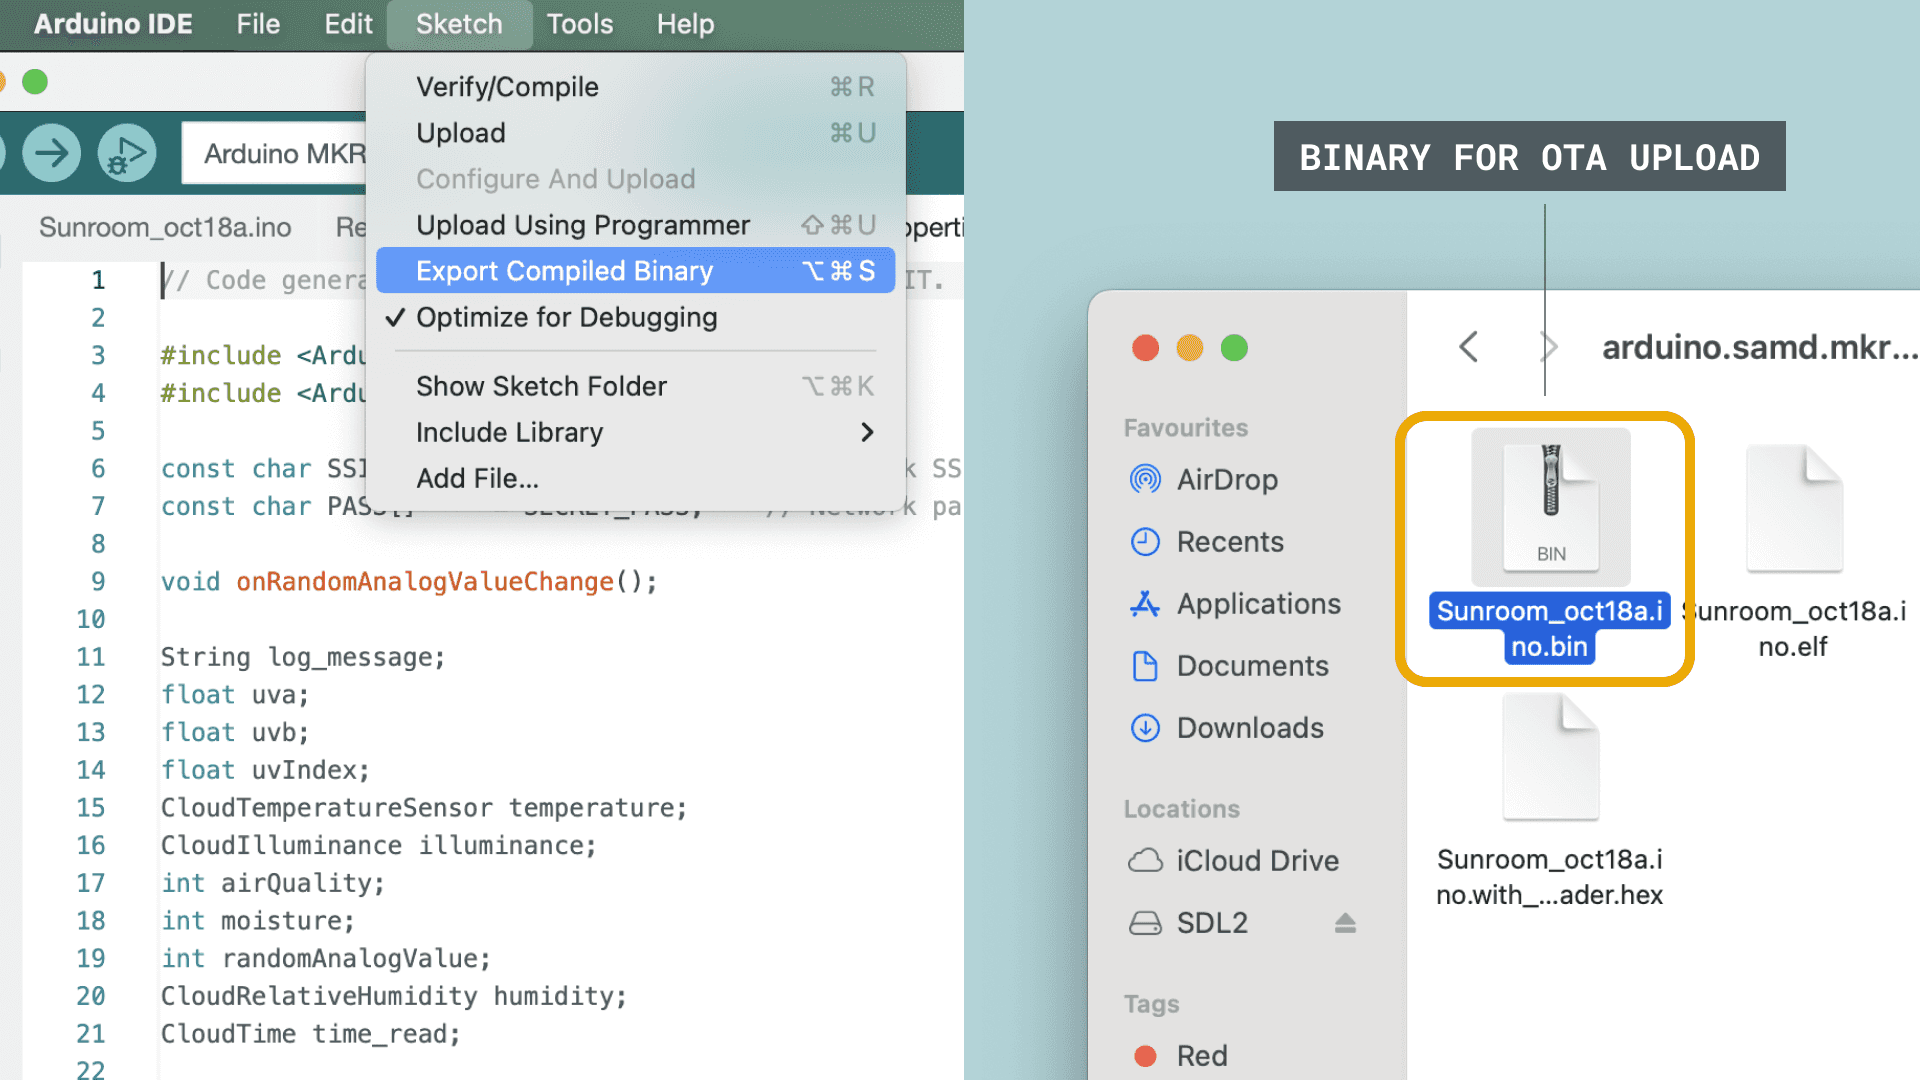
Compile with Arduino IDE
You can also compile a file through any version of the Arduino IDE (not online).
- In the IDE, with your sketch open, navigate to Sketch > Export Compiled Binary. In your sketch folder, a new folder called
will appear. The binary needed is located inside of this folder.build - To navigate to your sketch folder, navigate to Sketch > Show Sketch Folder. You will see the
file, which is the file we can use to perform OTA.<sketchname>.bin
Summary
The Arduino Cloud CLI is a tool that can primarily be used to extract a template from a single Thing or dashboard, and deploy it to several devices. It is also a tool for managing your fleet of devices, such as providing mass OTA uploads (such as firmware updates).
It is intended to be used as a supplementary tool for the Arduino Cloud web interface, but can well be used as a standalone tool to manage your devices, Things properties and dashboards.
The Arduino Cloud CLI can also be well combined with the Arduino CLI, a separate tool that brings the functionality of the Arduino IDE to your choice of terminal.
To recap, this tool can be used to:
- Extract templates from your existing Things & dashboards previously created in the Arduino Cloud.
- Perform the same actions as the Arduino Cloud but from a terminal (like creating/deleting devices, Things and linking them).
- List all available components from the Cloud (like
).thing list - Tag your devices & Things with the
command.--tags <key0>=<value0>
Suggest changes
The content on docs.arduino.cc is facilitated through a public GitHub repository. If you see anything wrong, you can edit this page here.
License
The Arduino documentation is licensed under the Creative Commons Attribution-Share Alike 4.0 license.